Showing posts with label WIP. Show all posts

Sunday, March 08, 2015

Turks - 2nd batch - WIP

Just a quick picture to show progress today on the 2nd batch of Gallipoli Turks... Base colours blocked in...


This time I have gone with a range of varied shades for the hats, tunics, trousers and puttees... using various shades of khaki, drab, canvas colours... GW Deneb Stone and Foundry 7c, 11b, 12b, 12c, 29b, 29c, 31c.
This was an attempt to break away from the brand new uniform look, and go for a more mottled worn campaign look ...
The shade wash will unify these colours.
Rifle stock was GW Vermin Brown... belts, straps and boots were GW Mournfang Brown. The Covered Kalpak hat I used GW Elf Grey.
Metallics were GW Boltgun...

I'll admit these were a little more fiddly to do than the first batch... and I also had to drill and pin the left hand to the arm for each model, then add a little greenstuff putty to make a wrist as the pose didn't quite line up here, it was about 1-2mm out, enough to be noticeable...

The gap in hand to arm
  ...plus the pose with rifle across chest, makes painting round it a bit awkward, but its a classic rifle carrying pose, so just have to get on with it...

Drilled and pinned... greenstuff wrist sculpted on top afterwards.


So next up, shade wash, and highlights... and then on with the 10 casualty figures which should be much easier... no rifle to worry about and only onse side to paint!

Mustering the Troops

Friday, February 13, 2015

Turks Progressing - WIP

Managed to get the figures tidied up, and then shade washes on last night...


A quick picture above, varied lighting causing differing shading appearance left to right...

The flesh was washed with Reikland fleshtone wash

The tunic and puttees and waterbottle, with a 50/50 mix of GW Agrax Earthshade/Vallejo Sepia

The trousers, hat, boots, strapping and rifle with Agrax Earthshade.

The painting guides suggest 2-3 coats of the this for the boots, rifle and strapping , so I'll give those another layer of that at the weekend... busy tonight, another game of Empire of the Dead scheduled with Paul... :-)

Highlights, then to follow to finish off, oh, and hair and mustaches to paint black!

Just heard from Roly, we've got ~130 painters signed up thus far, great to see this level of active involvement in Kiwi painters, and that means less figures having to be painted by each painter, down from 40 to ~30! Must admit that's a bit of a relief!


Thursday, February 12, 2015

Turkish Progress...

One week later and I have the 10 figures assembled and based coat painted...

I would have been a bit further on but wasted a couple of days trying to decide on paint colours to use...

Whilst there was a prescribed paint scheme to follow I couldn't source some of the colours; Ushabti Bone being the most difficult to find...

The local Toyworld recently closed down and that had been my goto place for GW paints... Wellington is next nearest option for GW , but its 50kms away and I don't honestly get down there that often... I don't work in the big city and actually commute the opposite way each day to work...

So that left mail order... sadly GW now has absolute rip off pricing for mail order delivery; $20 for delivery - ridiculous! To put that in perspective I just ordered a pot of vallejo paint for another project, from the UK, and that was supplied airmail for £2.15 ... So I wasn't going with the GW Mail order option...

The next options were mail order companies here in NZ with MightyApe and LiveWire and a couple of others I looked at,... but they either didn't stock the colour, or it was a specialist order item and would take 2-3 weeks to arrive, or was only available as part of a boxed set of paints...

When this project was first proposed I did worry that paint supply would be an issue (100 painters all in NZ, all ordering the same colours at the same time) ... oh well, best foot forward now...

So in the end I decided to just press on with the colours I had from my mix of GW, Foundry and Vallejo paints...

And thus, rather than slavishly following the prescribed colours I went with this picture from the Mustering the Troops blog header as my colour guide...


So here's what I have managed so far...


The colours I have used are:
GW Cadian Fleshtone
GW Mournfang Brown for Boots,Belts, Straps and Rifle Straps
GW Boltgun for Rifle Barrels and metallics
Foundry 12B Drab for Trousers and Hats
Foundry 7B Leather for Tunics, Puttees (lower leg strapping), and Water Bottles.
Foundry 14B Tan for Rifle Wood

They still need a little tidying up, then shade washing, and highlights...
I do have the required shade washes of Agrax Earthshade, and Reikland brown wash... so that should all work out OK...

So a few more days work should see them finished off over the weekend I hope, then ready for the next batch...

Saturday, February 07, 2015

Mustering the Troops!

Things have just happened here,  that have somewhat changed my painting and hobby focus for the next couple of months, and derailed somewhat, my planned painting output for the Anologue Hobbies Painting Challenge...

 I have become caught up in the no doubt frantic activity to get 4000 54mm Anzac and Turk troops assembled and painting in time for their inclusion in a large diorama as part of the commemoration of Anzac Day here in New Zealand, in April, about 50 days away... 

More can be found here;  Mustering the Troops

I received my first installment of 10 models; Turkish troops, on Thursday night and have so far, just  managed to get them all trimmed and glued together...


They still need some greenstuff puty work for a little gap filling...


But other than that I am ready to start priming and painting them...

I feel a little oddly placed doing this in someways...

As a wargaming period, WWI has never been of any interest to me. Nor have I ever painting figures in such a large scale - the last things that came close to this were probably 1/32nd scale plastic toy soldiers as a kid...

And being a relatively recent (10 years ago) British Migrant here in NZ, I don't really have any direct connection to the ANZACs either...

...but I do have enormous respect for their brave efforts, all those years ago, and can equally respect the Turks for steadfastly defending their homelands, against an invading force...

But oddly enough, I think my main motiovator here, is my own desire to do this as a kind of indirect thank you, to Peter Jackson, and the Perry's, who have commisioned and produced these figures respectively... for their prior efforts, in bringing Tolkien's world of Lord of the Rings to life...

If it hadn't been for Peter's movie trilogy, and the Perry's sculpting of the range of GW figures, ... I'd probably still be living in the UK! Nor would I have been able to enjoy playing LOTR SBG for all these years now... So thank you Peter, and the Perry's!

A little voice has just chimed in, reading this over my shoulder, that I have also been given lots of encouragement from wifeypoos to get involved and do my bit... I even got away with not doing the washing up last night, to get on with the work! Long may it continue!

So, I'll wind up here, as the glue has probably dried enough for me to get back to work on the figures!

Stay tuned for more progress...

Wednesday, January 07, 2015

Ruins of Osgiliath (GW) - WIP

A recent great deal with Dave Docherty, netted me some LOTR goodies over Xmas...


Now the Painting challenge is in full swing, and I should be painting, but I find it hard to sit inside on a sunny summer day, and I can't paint outside, but I can trim models... so I trimmed and put together one of these sets of ruins...

They went together quite well, but there were a few gaps to fill - I used DAS clay.


Once the clay was dry I went over with thinned PVA and sand to give them a more dusty/rubbly look...


I've just based undercoat sprayed them, ready for some paint later...

I do rather like these as they have some thickness to them, and have detail on boths sides. And I belive you can add sets together or stick bits on in differing places for variety. I'll see what I do with sets 2 + 3.

I think they will also do for other settings too -  Pirates exploring a lost ruin on a Desert Isle or, the ruins of the old Abbey for Empire of the Dead...

Wednesday, December 03, 2014

Radagast the Brown on Sleigh - WIP

Well my last few nights hobby work and I have finally got this put together...

Its a Resin kit, and needed the usual trimming and scraping and bubble holes filling. Thankfully there weren't too many of these and none in any critical areas.

It's been a bit of a mission to assemble it... the front end on the sleigh required all three sleigh pieces to be heated in hot water and bent to shape. Much trial and error and tweaking and reheating until things worked out.


Radagast himself was in two pieces; main body, and cloak with right-arm, which was not too bad to glue together and the parts lined up well.

The side little terrain bits were easy to trim and assemble...


Of course the last bits were working out how the rabbits went together. There's 4 strands of them which again were a bit of trial and error to see which combos would be the best fit.

I had to trim some pieces of resin from the sprue to shape to join the reigns between each two strands. Fiddly work but its worked out OK, and the joints have then been concealed with a smear of liquid greenstuff over the top.

So finally assembled and ready to be primed. It will be joining my entries for the Analogue Hobbies painting challenge and I feel will make a great entry in the 'comedic' category... :)

Monday, October 27, 2014

Middle-Earth Miscellany...

The long holiday weekend here in NZ, gave me a chance to catch up with Brett.

Brett is getting to grips with the game, having played it occasionally, off and on in the past...

He has acquired a bunch of figures of various factions and has been learning the ropes with a small Elven force of Galadhrim... Our last meeting saw me take a Moria force with a couple of Cave Trolls and they turned out to be a bit of a handful, so this time I decided to just go with regular troops, nothing flash but the upshot is, there's lots of them.

So I selected a Mordor force, with 4 Orc Captains each leading a full orc warband, one of which was my newly completed archer warband. I also added a Castellan to make the points just over 500pts.

Bretts elven force was fairly small and compact, with Rumil, a Stormcaller and a captain leading the Elves and an allied contingent of Riders of Rohan, lead by Eomer (proxied by Boromir).

We rolled off for mission and got Domination - which puts 5 objective markers on the board to take and hold...

We played on a relatively small table... deployment below...


The game played out fairly predictably with the orcs moving forward into the shooting of the elves and riders... the shooting took a slow but steady toll of the orcs as they advanced, until range became the issue as the orcs closed in...


The riders had a bit of a redirection , causing the orc pack to change their course of advance, but the orcs had managed to collect all but one of the objective markers by this time, which the elves held in the building courtyard...

Brett wanted to try out his cavalry charge and duly did so, but making his charge on his own priority, allowed the orcs to move in and surround them. One rider that was positioned to try and block some of the orc response only really served as a spring board for a mass of orcs led by a captain to strike him down and move on to join other fights, thanks to a heroic fight from the orc captain...

The rest of the orcs pressed on towards the elves...

The riders went down, with Eomer resisting for a turn until he too was slain in the following turn. The Elven storm caller tried to come to his aid, unleashing Natures Wrath in the midst of the chaos, but despite rolling a 5, an orc captain managed to resist the spell... this pretty much sealed Eomers fate...

Sorry but no more pictures as we both concentrated on the game...

The orcs then advanced and brought numbers to bear on the thin elven line, with spears backing up the orcs along much of their battleline...

But the elves clung on grimly for several turns whittling down the orcs, their high Fight skill keeping them in the game....

Eventually though the pressure became unbearable. Rumil was surrounded by 2 orc captains and another orc, and though resisting for a turn, he was felled in the subsequent round. The stormcaller had also been killed by an orc captain who had again used a Heroic fight to kill an elf and leap into action against the the elven spellcaster..., the turn previously...

Eventually it was all over and the Game came to a close as the elves dropped to 25%, though the orcs were broken too...

The orcs had won fairly convincingly claiming all but one of the objectives, I think... the one in the building courtyard was possibly contested....

However it was only after finishing the game that I realised I had completely forgotten about taking courage tests, for both sides, for being broken. The elves with their high courage would probably have been relatively unaffected by this but the orcs certainly could have lost more troops...

So apologies to Brett on that score... The game wasn't 'serious' as such, still a learning game in some ways for Brett, and I hope the forgotten courage tests will go forgiven as I tried to help with the other rules  and tactics in the game :-)

The main lessons I think Brett got from this game were perhaps the cautious use of cavalry, and being careful when to commit your charge... and also the effect of heroic fights allowing troops to leapfrog from fight to fight... and also how a thin elven line can still put up a lengthy resistance due to their high fight skill.

Hoping to have more games with Brett, as he gets a better grip on the rules and his elven force.

-----o0o-----

Th rest of the weekend was pretty wet and miserable with a cold southerly blowing through, so a mug of tea, and a bickie or two, and The Hobbit playing in the background let me press on with some modelling and painting...

So here's a couple of WIP's...

I am busy working on 6 Mounted Rohan Royal Guard, here having just finished their base colours... shade wash and work up still to go... The horses have been shade washed...


Rohan Royal Guard - WIP

And I thought I'd have a go at a conversion I have seen done before; Grima on horse. The recent KWC 'Bring and Buy', saw me pick up a cheap Grima and spare RoR... so I set to, cutting out the central leg area of Grima but leaving his robes at the sides and chopping the top off the RoR to allow his legs to be Grimas mounted seated pose.

Some greenstuff to fill gaps, and we're just about ready for paint...
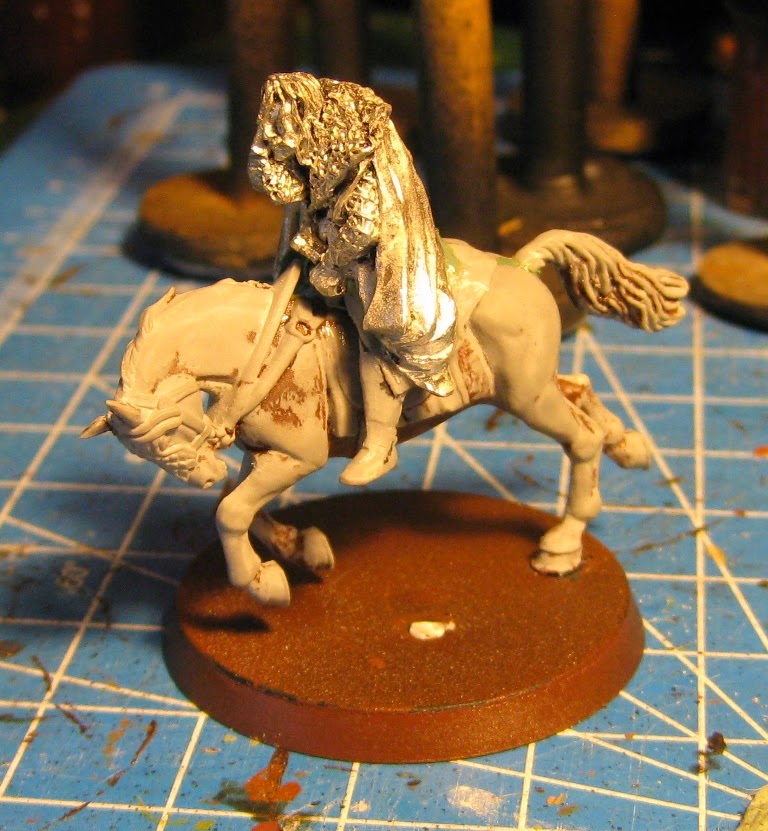
Mounted Grima - WIP

That's all for now, hope you all had a good weekend...

Tuesday, June 24, 2014

Weekend work - Moria continued...

More work over the weekend, saw progress on my Moria terrain...

I managed to build up the rocks on back wall of causeway to right of stairs... polyfilla looks dark as its not fully dried yet... also, photo perspective may seem odd... I actually had it lying on its back while I worked on it, and photographed it that way, and have rotated the picture around - that's why the paint tin is upside down in the background ;-)

The side wall is undergoing more reinforcing and straightening still... that part of the build is becoming a bit of a nightmare! I am beginning to wonder whether I should even bother with it, but its one of those classic movie moments - seems a shame not to try and do it justice... I'll get there in the end I guess... this project is rapidly becoming known , at least to me, as 'Bowmans Folly'! ;-)

I should buy shares in Polyfilla!


Back to the Bridge of Khazad Dum board... and I finished making the chasm edge... with my DIY 'plaster cloth'

I made up more polyfilla, though quite runny with an excess of water, then also poured some PVA glue into the mix. I cut strips of crepe bandage and dunked them in the mix, keeping one end dry. This I hot glued to the top edge, then draped the wet cloth down over the chasm edge, going back over the dry top piece with more of the mixture to blend it all together. Strip by strip, I worked my way along both sides... a messy process but it worked and is strong.


I now want to texture up the surface of this chasm, and am thinking of breaking up more foam (or maybe also bark mulch chips) into tiny fragments - spraying the surface with thinned PVA, sprinkle the fragments on , then spray again with glue to seal, them maybe skim coat with thinned filla again if it needs it or just paint with sand textured paint... I'll have to try it out see how it looks...

I was looking long and hard at the rubber rock molds you can get from Woodland Scenics and other suppliers at my local hobby stores. They are rather pricey and you would need several different ones to avoid repeating the same rock over an over... hmmm ... I like the look of them, but...

I also got my Dwarrowdelf pillars finished and painted... I'll show them soon, after the Watcher in the Water Battle report, as would be about the right timing! ;-)

Further Moria activity included cutting out a base board for Balins tomb, and sketching out a plan of how to build up the walls and pillars on it... So I guess that will be more foam cutting this weekend...

Monday, June 02, 2014

Durins Causeway continued...

Happy Birthday Mrs Queen, thanks for the long holiday weekend! The long weekend here has seen more terrain modelling work on Durins Causeway, and the Watcher Board.

I have skim coated the whole structure of the causeway, in polyfilla, and then built up the rocky areas using off cut chunks of white poly, (left over from the pirate isle build) and expanding foam filler (Sika Boom)...

I also sourced some bright yellow LEDs to have a go at making some flame effects with water effects resin, for the gullies in the base... but that will wait for next weekend, probably...

So here's the causeway done up to this point...


The left side wall panel, with 'shooting gallery' for goblins... pillars still to be constructed...


More expanding foam filler added... to side wall...


...and main board...


The foam filler will then be carved up with a box cutter knife into a more rock like appearance,  getting rid of the unnatural ballooning circular whirls... this will then be skin coated in filler again, and finally painted with sand textured paint...

The only thing I am pondering now is, I started this build going off the game base dimensions quoted in the scenario; a 24" x 36" board. Then I decided to add the side wall... The only problem is, when I now add this side wall to the board, for the rocky wall with goblins shooting gallery... it looks VERY close to the causeway... compared to movie images... whether its just a case of, well get used to it, that's how I've made it... OR... expand the width of the board, moving the side wall further away and adding an extra piece of base board and back rock wall section to join it all up??? I'm going to have to ponder this... I cant make it too far away, or the goblin bows will be out of range!

-----o0o-----

Back to the Watcher board, and I have had great success with the 'Envirotex Lite' epoxy... for the water area. I made three successive pourings and each dried easily and clear within about 5 hours. I used a translucent dye (Olive Brown) in the mix to darken the colour of the water. Once this was dry I went over the top surface with 'Liquitex Gloss Gel Medium', and used a stippling effect with end of a make-up blusher brush - a spare one rescued from wifeypoos stash - she wont notice one went missing surely??? ;-)  This has dried well and I am very happy with the result.

I am just putting finishing touches to the stream and water fall, should be able to put finished pics up Monday or Tuesday... and then finally get to play the Watcher in the Water scenario... its been a long wait!

-----o0o-----

To finish off the weekend, Chris and I had a game, continuing on from the last battle game we had that featured on his blog, the rescue the artifact one... the gist of this game was 350pts of woodelves led by a weakened Legolas, fleeing through Mirkwood, but having evaded their pursuit from the battlefield, are then ambushed by beast in the woods; wargs, spiders and bats... It was a quick and brutal little game, which Chris might write up for his blog, so I wont spoil the read by giving the result here!

-----o0o-----

As a final touch for the weekend, having completed the Hobbit dwarfs, and little weapon stash yesterday, I couldn't help but break open the Trolls; Bert, Tom and Bill and got them assembled today... great models, cant wait to paint them up!

Busy busy as always... till next time...

-----o0o-----

PS - forgot to mention this before but Ste is having a give away , check out his excellent blog here:
http://offtclub.blogspot.co.nz/2014/05/as-promised-competition-time.html

PPS - After the switch to Google+ comments trial - I wasn't happy that it still wasn't giving me an email feed of comments (couldn't find any setting to tweak to change this), nor was it logging any comments as a number at the bottom of the post on screen, plus the comments pane within blogger 'desktop' had disappeared ... so I switched back to routine Blogger Comments... If you have left a comment under Google+ comments, it may well have now disappeared... Thanks for putting up with the disturbance to service here!

UPDATE - 6/6/14 - Just noticed, since the side panel had not been attached to anything, as the glued on foam blocks and expanding foam has dried the wall piece has warped in over ... stupid mistake to make... so That kinda forces my hand - I'll widen the board and glue extra mdf sheet with reinforcing strips to counter the warping of the side panel.... I am actually now thinking of adding a piece behind the top door of main panel, a flight of stairs down to it... this would allow a join up with Dwarrowdelf section and Balins tomb... modelling megalomania - my mind knows no bounds - or sanity!? ;-)

Monday, April 21, 2014

The Watcher - Basing and painting... WIP

More progress with The Watcher over the last few weeks...

The base piece for the Watcher comes with a small rocky outcrop, with the skeletal remains of 3 dwarves  lying up on it. But the rest of the base would be flat with no further detail. So I wanted to build it up a bit, and used a bit of cork tile, some DAS clay, a little Greenstuff and some model railway ballast to jazz it up a bit. I cut two holes in the cork tile, these will be filled with Woodlands Scenics - Realistic Water to effect two murky pools as befits the Watchers watery realm...


The completed Watcher was spray undercoated black then base coated in Foundry 28A Phlegm Green... The base was also black undercoated...


The tentacles also received the same treatment. These have been mounted on 3mm MDF 40mm discs.


I have subsequently washed the Watcher and tentacles in Vallejo Back wash, and then dry brushed up the base in shades of gray and made a start painting the skeletal dwarves.

The green areas were then drybrushed back up with 28A, then 28B...

For those not 'in the know', Foundry do a great range of paints with each colour available in three shades; dark being A, mid tone B, and highlight C. So you always know which pot of paint to grab! Easy! And they can now be purchased as individual paints, rather than only as sets of 3, as you always use more of the darker and mid tone shades than the highlights... You also get 18mls of paint per pot, compared to 12ml in GW paints...

The under sides were then painted up in Foundry Flesh 5A..., washed with a GW Ogryn Flesh wash, and highlight lined with Foundry 5B Flesh.... this was the laborious part...

Saturday, March 08, 2014

Desert Island Discs... A terrain WIP


Well, I guess if you are going to play some pirate themed games, you're going to need a desert island for them to bury their treasure on!

Many moons ago I had planned on doing one of these, but as usual, distraction by other games led me astray...

Our recent pirate shenanigans using both LotHS rules and EotD rules, elicited a comment from Dave, that I should make a desert isle, so the idea was resurrected... so I'm blaming you for this Dave! ;-)

I thought afterwards I could perhaps also try having a small garrison there of Gondorians or Fiefdom troops for LOTR, and have them try and repel a raid by Corsairs of Umbar! One of the great things about some terrain pieces is its multiple uses! :-)

These guys might finally get an outing too!

I had a left over 4' x 4' x 2" poly sheet, which I took the bread knife to and hacked into it 4 landing sites, which will lead down to beaches, and then hacked in a rocky coastline around the rest.

Yes I know, desert islands are not normally 'square', but I was trying to maximize the playing area for our prospective games...


Having got cut out the general isle shape, I went and got a sheet of 12mm thick MDF. I decided to go thick to try and minimize any warping from using the PVA glue, to glue the poly sheet to it...

I used the poly sheet as a rough template, drew round it, and then set the jigsaw over at as much of an angle as it would go, and cut out a matching shape, allowing extra space all around...

I then used a chisel and tenon saw to further reduce the angle of the beach. I am trying to make terrain, that when you put figures on it, they don't fall over - one of my pet hates!

So we ended up with this...


I then turned it over and applied several strips of duct tape, across the back, along the edges, to again further try and reduce any warping... I hate warping too!

Once all done, I flipped it back over and glued on the poly sheet with PVA. Weighted down with all those spare rule books and history books - they always come in useful for something! ;-)


I then got some off cuts of dense poly foam, and tore it into varying sized pieces with my fingers, then glued these round the perimeter cliffs... several pics below so you can see what I mean:


I left this to dry fully over night. If I have any spare time tomorrow, I'll set to, skim coating all the rocky bits and cliff surfaces with polyfilla.

Once finished the Isle will sit directly on the painted sea surface on my gaming table top... so there will be space to have ships alongside...

While that was done and drying I decided to make a ford section to go with my existing river pieces. I am just about up to the Flight to the Ford scenario, in my Fellowship of the Ring campaign with Chris, so felt this would be a must. 5mm MDF sheet, cut to shape. Some cardboard strips covered in sand textured paint for river banks, and some red lentils for pebbles and river stones in the ford itself. The laborious bit was placing each in turn, rounded side up...


Once that was done, it was left to dry...

Finally on the terrain front for today... I decided to redo my hills. I made a heap ages ago with a polystyrene ceiling tile cutter, but the mouth of the cutter was fairly small, meaning the angle I could cut the poly at was not the best... hence the miniatures falling over problem, so I resolved to fix that and got the bread knife out again and hacked down the hills sides to gentler slopes, and sanded smooth, so the figures wont keep falling over...

Far more figure friendly - I just have to repaint and re-flock them know... a job for tomorrow if the hobby shop has any static grass in stock...

So that was today's terrain effort... might get round to a spot of painting later this evening...

The weather was not the best today, so no guilty feelings being in all day and the kids were out at a friends birthday party, so that was cool too! Sometimes you have to grab opportunities in time when you can!


Friday, February 21, 2014

The Walls of Moria... WIP

Looking ahead to some more of the scenarios we'll be playing in our Fellowship of the Ring Campaign... I've stared working on models and terrain I am going to have to get completed...

Arwen carrying Frodo On Asfaloth is base painted, on the painting table, and tonight I made a start on the Walls of Moria. This is used in the Watcher in the Water scenario,... and can also be used later in the Dwarrowdelf and Bridge of Khazad Dum scenarios...

Here's what I knocked up tonight... wifey-poos was working late and the kids were happy playing Lego-LOTR together on the PC - I could hear the giggles from where I was working... so I had a spare moment or two...


Its three layers of dense poly sheet glued together, and based and backed with 5mm MDF for strength... clamped while it dries overnight.

This is roughly what I was following, though I didn't what it to look like three layers so I added lots of little bits... to break it up...

Once the PVA is dry, I'll be using some filler to start filling gaps and building up a textured surface, that will be finished, once that's dry, with a coat of sand-textured paint...

Oh and I've ordered the extra wargs I needed for the Hounds of Sauron and Lothlorien scenarios...shhh... don't tell the wife... I've been spending again! ;-)

Bye for now...

Thursday, December 05, 2013

Corner Pub / Tavern - WIP - basic shape

Whilst working on the Empire of the Dead base board, and with the MDF side panels gluing into place one at a time, I made a start on the next building for my cityscape -  a corner site Public House or Tavern...

Again, 3mm MDF forms the basic structure. PVA glue is dry enough to hold it together after about an hour and should get to full strength over night...


Three level building again, measuring about 10" x 11", with an angled main entrance way, and rear yard area...


While this was one drying, I made a start drawing out the plan for the next building... this time a high street shop... I'll try and get it cut out and assembled over the weekend...


Monday, December 02, 2013

It Lives...!

It lives master, it lives... heck, that's what it feels like using this stuff...

With the poly sheet and piping glued down I decided to fill the void around the pipe with expanding foam filler... I'd used a can of this ages ago, thinking it might create some rather cool cliffs I could carve and sculpt, but I found it too uncontrollable, when used without a controlling frame of reference... and ended up with a huge uncontrolled and unusable 'blob' and just biffed it in the bin... that was quite sometime ago... I do recall it made a right mess and was a bugger to try and clean up, darn stuff seem to stick to everything...

So with that vague memory haunting me somewhat I set to again, read the directions... yeah I know, men don't read instructions ;-)... and even read the ones on the can of clean up spray I got too...

With latex gloves on, and hearty high ho silver, I let rip... is that it...? OK squirt a bit more... still seems a bit thin and hasn't reached the top of the poly sheet yet... hmm, squirt a bit more ... there that'll do... OK clean up time... wahay this stuff is pressurized spray acetone... wee ...nice smell,  splash it on all over, eh 'arry? 'arry? Wheres 'arry?

Thank the Gods I had opened the windows, or I'd be floating round the ceiling somewhere...

Anyhoo... I got cleaned up so I can use the rest of can for something else... gave it half an hour or so, (drying time on can) and came back, and its swelled like you can see below!


... by the end of the night, its just about doubled in size again... I foresee a hearty time with the bread knife and dremel tomorrow! Wish me luck!


If your gonna use the one on the left, make sure you get the one on the right as well! You have been warned!

Oh, and you can probably use about half the amount you think you're gonna need, coz yep, it expands, ...just not instantly...

Saturday, November 30, 2013

A foggy day in old London Town! - WIP - Empire of the Dead base board

With Curts painting challenge approaching, over on Analogue Hobbies blog, I have been hard out all week prepping stuff to paint for the challenge... So far I have 5 15mm PSC Panzer IV F1's, a Battlefront 15cm sFH18 Howitzer battery of 4 guns, another pack of Battlefront Begleit Tank escorts, for my StuGs, my Hobbit set of 13 Dwarves and Radagast have been rescued from the back of the painting table, and I made a start on my Requiem EotD stuff, prepping the Gentlemen with Guns, Lycaons, and the character pack of Dracula, his brides and Renfield. I've also done the 4 40k terminators to go with the test Das Reich terminator I did sometime ago...

So if I get through that little lot over the next couple of months I will be thrilled. I am keeping an eye on the fortnight theme aspects of the challenge too, and have some ideas for civvies, casualties etc...

After all that figure prepping, I thought the weekend, should give me a little time to work on terrain, and a wet and windy Saturday gave me a perfect chance to make a start on my Empire of the Dead London base board...

Now since some fine fellows suggested I should try and add some fog effects to my terrain board to go with the Building lights and Gaslamps I did, I thought I had better make a start...

I got a sheet of 5mm MDF and a 2" think sheet of polystyrene, cutting both to 48" x 48". I also got some 15mm dia plumbing pipe, with simple screw-fit connections, and made a start on a piped sewer system. I blanked off the ends of the pipe and added an upright to each that will just stick up proud of the poly sheet for now. This will be covered with a pastic mesh that will look like a drain cover...

The pipework will allow dry-ice to be pumped into the game, giving a foggy ground layer to the game.


Here's the pipework in place, on the MDF sheet.


I also used the pipework as a template to cut out the poly sheet...


Then the pipework was glued into place, and the poly sheet glued down around it. This will all dry overnight, giving the PVA glue a good chance to dry out. The books weigh it all down while it sets... I knew all those rule books, supplements, magazines and history books would be good for something! ;-)


While all that is drying... I finished off my 'smoke machine'... an empty 900g powdered food tin, a 2.5" 2nd hand computer case fan, a 9v battery cap connector was soldered to this, to power it up, glued to the plastic lid of the tin, that I had cut a fan sized hole in, so it blows down into the tin. An off cut of plastic pipe, and a bought piece of flexible pipe from the plumb shop, and we are ready to go... hot glue and insulating tape finishes it off...


...so this is all connected to the pipe 'sewer' system, via a screw fit straight connector... all I am waiting for is a test run...


...I need to get some dry-ice... the trick is, put some boiling water in the tin, drop in some dry-ice, put lid on and whack the fan on and, hopefully, hey presto - a smoke laden gaming board...

...for the chemically curious among you, the dry-ice, sublimes, i.e. goes from a solid, straight to a gas, missing out the liquid phase... to create a cold ground hugging fog effect... common to all those 70's pop group stage videos etc. and cheesy horror movies...

Warnings! - the dry-ice is seriously cold ( −78.5 °C), handle with thick gloves to avoid frost burns, oh and the gas is  CO2, so open the windows too, to avoid hypercapnia!

If I get it all to work, I'll upload a video... fingers crossed!


Related Posts Plugin for WordPress, Blogger...