Showing posts with label Painting and Varnishing. Show all posts

Tuesday, August 12, 2014

"They have a Cave Troll..."

Brute strength and bad attitude, the humble Cave troll... wielding a scavenged dwarven heavy spear, or trident, most probably designed to try and deal with these huge beasts... and flailing its chain lash in front...


The model was actually part of a bulk figure haul I picked up some years ago... but it was in a poor state... its a plastic kit and had noticeable gaps in the joints, the plastic chain was hanging on by a 'thread', the trident was missing a prong, the back end of the spear shaft looked like something had chewed it, and it had no base... As I already had a metal painted up cave troll, I was in no hurry to do anything with it, so it languished in the bitz-box, unloved...


But with recent success using the Instant Mold, on the gyrocopter repair... I thought I'd dig it out and and see what I could do...

So I took a mold of the good side of the trident head, and cast up the prong with some Milliput... and filed it and glued it into place...


I had also sourced some model chain from local store, some time ago... one of those things you think will come in handy... for 'something' someday... well it found its use on this... I trimmed away the busted plastic chain and replaced it with the model chain... Greenstuff to fill the gaps and a new base, and we're ready for paint...


Painting was fairly straight forward, only a few colours to worry about... some shade wash and drybrushing and a little detail work, and job done... Simple base detail to reflect its rocky mountainous home...


So I have another Cave troll, to add to my Moria or Angmar forces... 80 points of brutish nastiness...


Cave trolls have decent Fight and good Strength and Defence and 3 attacks and wounds... but no Might, Will or Fate... in past scraps using one cave troll, they invariable get immobilised by some dratted spellcaster and then chopped up by a plucky hero, shot up by a barrage of archery or just mobbed by troop numbers...


Now that I have two, that hopefully will mean that while the enemy deals with one, the other can cause some mischief...


I sincerely hope so... plus if combined with some Might wielding heroes, then some Heroic moves and Heroic combats may be the order of the day,... and those new Monster Brutal power attacks my get a use after all :-)


A top down view just to show the cast trident prong... not perfect but pretty darn close and you probably wouldn't have noticed it if I hadn't owned up on it!?

Looking forward to squashing a few men, elves and dwarves with this big fella, just so long as the sun don't shine, otherwise he might be needing some of that factor 1000 sunblock! ;-)

Sunday, May 18, 2014

Middle-Earth Madness and Water woes... Haldir, and Hounds of Sauron

Continued work and play over the last week or so...

On the terrain front:
I continued work on the causeway, widening the whole structure, by adding another layer of the styrofoam against each facing. I increased the length of the broken stairway section at the top, and then, after watching the movie footage again realised there was another turn and more stairs at the bottom... so I added another stair section and raised the whole by another ~ 6". I also started on the base board using some of the foam material that was packed with the Styrofoam delivery. This new pink material has a consistency very similar to that green spongy foam florists use for flower arranging... its very light weight and fairly soft and crumbly. However its going to get coated in Polyfilla so should hold up OK...


I also had tried etching in a brick pattern with a ball point pen. This process worked well ( a lot easier than the DAS clay etch of the Victorian Buildings though yielding a wider mortar join.). However after finishing a couple of facings I couldn't help think it made the whole thing look like a Victorian rail  bridge structure... so I am going to skimcoat filler over the top and not bother with a brick pattern... I think if the filler goes on rough, painting and drybrushing should yield a good enough texture to it, making it look either hewn from the rock or with some kind of render applied by the dwarves...


With the rest of this pink foam, I cut it to 5" thick widths and used to make a raised board for the Bridge of Khazad Dum scenario. I'm going with the description for the scenario from the new The Hobbit rulebook, so a 4'x4' board with a 6" wide chasm across the middle...

Tins of paint weighting down the top sheet of 3mm MDF. The bottom sheet is my left over piece of 12mm MDF from the sheet used to make the Pirate Isle. I figured this thicker sheet would be best for the base of this structure to stop it flexing through the chasm area.


On the miniature painting front;
I have been steadily working through the Hobbit dwarves set and am nearing completion, but I'll hold off putting pictures up just yet as I feel they'll deserve a post of their own... However I did complete Haldir of Lorien, in among painting the dwarves, for the upcoming Lothlorien scenario;

Haldir of Lorien

In gaming news;
Chris and I replayed the Hounds of Sauron scenario, using my tactical suggestion of backing the Fellowship up against the large rock just off centre of the board, and defending that area.

A heroic march to start, had the Fellowship pretty much in position on the first turn. Second turn had them aligned well as the Wargs caught them. Legolas climbed the rock to take up a firing position. And in rushed the Wargs. This time it was pretty much a breeze... none of the front rank defenders; Gandalf, Boromir, Gimli and Aragorn, ever had more than 2 wargs on them at any time, and Legolas was able to pick off wargs against Gandalf, who was probably the most vulnerable front rank fighter. The hobbits settled down to watch the show and the bodies of the wargs piled up...

Fellowship defends against the Hounds of Sauron

16 Turns later, and we drew the Priority roll, ending the game... The Fellowship members had not lost a single wound, though possibly one fate point, I can't recall exactly... and they had butchered dozens of wargs and the Wild Warg Chieftain.

So I'd call that a success! Chris was whooping and cheering as the game went on ... so I was happy to see his spirits raised once more :-)

So next mission and on to Watcher in the Water...

Which brings us back to terrain matters, and tales of water woe!

I have used Woodland Scenics Realistic water, for a couple of past projects, including pouring the stream on the Helms Deep, Deeping Wall scenario, and when I made my Normandy Beach section. And for the most part it has worked well. So long as you pour it in thin layers and allow to dry between each pour...

Its a fairly clear liquid that pretty much self levels with each pour... and once dry is transparent with a glossy water sheen.

Recent use though has been a little problematic as its has taken some time to dry in the autumnal conditions here. Its also not the cheapest product to buy either, and I decided to Google about and see what alternative cheaper products might be available... and I came across this webpage from a model railway blog...

http://modelrailroading.wordpress.com/2009/01/31/open-the-floodgates-pouring-the-water-for-your-model-scenes/

If you read the page, you will see the author discusses an 'Identical' product to Realistic Water, that is much cheaper, and available through art stores. I was quite pleased with this find, and further finding the product available here in NZ, at roughly half the price of the WS product. So I ordered a pack of the Golden Acrylic, from Gordon Harris in Wello and it arrived 2 days later.


I cracked open the top, to find an opaque white product. Hmmm ok, well lets give it a go... Yep it poured out but it was very thick and was not self leveling, and had to be spread out with a spatula-like tool. It was still pretty thick after spreading, and not flat... 24hrs later with a fan blowing across it and its still white and wet... I am hoping like mad it will eventually dry out and go clear. Fingers crossed!!!

Another product I came across was this Magic Water... though it seems relatively expensive and I couldn't see a NZ based supplier so that would mean International shipping costs on top...


It does sound like a very good product.

However, yet more Googling and I came across this video: (skip past the ad at the start)


This is just the sort of finish I want for my water areas, and what a great video find, to see how its done.

Not only that but looking at the cover of the Fellowship of the Ring Journey book, shows the same water finish effect there used for the Buckleberry Ferry scenario/diorama  ;


So back to that video, and the product used to make the rippling water surface is Mod Podge:


More Googling and I found this stocked here in NZ at Warehouse Stationary... so I've bought a couple of packs. So if that Golden acrylic product ever dries, I'll be using this over the top to get the surface finish I am after!

Finally for today, and on the purchase scene I managed to grab a set of Minas Tirith Walls off Trademe. Now discontinued, this is now only going to be a 2nd hand purchase from Ebay or Trademe... So I was happy to find a set here in NZ for sale, so I didn't have to pay international shipping.


I'll use these sections as templates to make more sections from yet more Styrofoam... Now I've got a reason to get on with painting all those Warriors of Minas Tirith I have!

That's the thing with gaming Middle earth, there's so much to it, so many locations and differing Factions, you never get bored!

Till next time, dear adventurer, hold true to your purpose, and make sure you have some Lembas Bread or seed cakes about your person!


Sunday, September 09, 2012

Wet Pallette

Is your palette wet? No? Then it should be!

I can't claim any credit for this as I stumbled across it while blog surfing the other day. I was going to link back to it , but can't find the original post now...(I think I had clicked on a linkwithin widget at the bottom of a post I was looking at).

Here it is;


It doesn't look much but you are looking at a wet palette...

Ever got tired of endlessly flipping open pots of paint, while you work through the colours on a figure, especially when doing all that tidy up work? Or maybe you use a palette but the paint dries out fast on it? OK so you can use some paint-drying retarding agent, but that's another product to have to buy and mess about with...?

I tried this wet palette out this afternoon and was so impressed, I had to write this quick post...

It is easy to do, its just the metal cap lid from a glass food jar; something like pickled onions, or whatever... but I guess any slim lid type thing will suffice...

Pack the lid with toilet tissue (bog roll), and soak it in water, and drain off the excess. Then get a piece of grease-proof paper, cut out a circle to fit over the top and press it down on to the damp surface. And voila, a wet palette...

Just put out the paint colours you are working with direct onto this surface, and they will stay workable for hours without drying off. I spent a couple of hours easily with the above small dollops of paint working through some base colours on some FoW Germans, and even left it as it was time to go and pick up my son from a playdate, came back and the paint was still fine to use, and I dare say it would be for hours more...

Just not having to keep opening and closing pots of paints, dramatically reduced my painting time, and simply saved hassle... all the paints I wanted were right there, and quick swish in the water dish to clean brush and I was easily switching back and forth between colours.

Amazing, wonderful, so simple yet I had never come across it before in over 20+ years of painting...

So there you go, give a whirl if you haven't tried it before. I think you'll be impressed.

Oh and just to finish... when I had finished with the above, the excess paint could still be scraped up with a brush and put back in the paint pots, so no waste either!

[if it was your blog post I was looking at, you are more than welcome to add the link in comments below, and thank you again!!!]


Sunday, February 26, 2012

Airbrush, and the next generation continued...

Well I finally managed to get my halftracks completed yesterday, adding all the decals and varnishing them on. Just waiting for the this evening to go dark so I can get some decent lighting for pictures under the fluorescents in my gamesroom... Then I'll post these to Curt at Anologue Hobbies...

Having completed this task, I decided to unpack the airbrush that I had ordered and that had arrived earlier this week:


 Thanks to mate Greg, for showing me his airbrushes, giving me an idea how they work and a recommendation, I picked up via trademe from a dealer in the South Island.
Here it is set up in my garage, good to go...


And here's it first use, I base coated Christophers FoW 8th Army British with Iraqi Sand for their predominant uniform colour...


Its now motivated him to pick up the paintbrush again, here he is having done their helmets, now working on their skin colour...


Good lad! Makes his dad proud :-)

Tuesday, January 17, 2012

The Next Generation, Part2: Paint Station


In an effort to further encourage my son to get to grips with painting his 8th Army troops, I decided to make him his own 'paint station'. I roughly copied the 'GW design'... though I put the water container holder on the left of the station as he's left handed.

Its a simple construction made from 3mm MDF sheet. Pieces were cut out using a power-jigsaw, and sanded before being glued together with PVA wood glue. I considered using some small panel pins too, but 3mm is very thin to get one in without it splitting the MDF anyway, so I left it with glue only.

Very cheap to do, I think theres's probably less than $5 worth of MDF here. I'm not the best woodworker in the world, but it wasn't difficult to do, took about an hour or so...

Here's a quick plan:


...and the station as is...


So now he can set this on his desk, that can be put beside my painting table, when he wants to get some work done. And he wont be hogging my painting area so I can get on too!

Just need to get him an angle-poise lamp that can fix to the side of his desk and we're away.

As you can see from top picture, we have the first 24 infantry figures undercoated so far...

Like father like son...

Wednesday, December 14, 2011

Analogue Hobbies Winter Painting Challenge - The Gauntlet is picked up!


Well, I have had a rummage through the cupboards, and have dug out what I hope to work on through the period of the challenge, as can be seen pictured above.

  • a box of Flames of War - Battlefront Typhoons
  • 4 boxes of Plastic Soldier Company (15mm for FoW) - SDKfz 251's - thats 20 vehicles!
  • a box of Flames of War - Battlefront PaK 40 platoon.
  • 1 blister pack of Flames of War - Battlefront German HMG platoon
  • 1 blister pack of Flames of War - Battlefront German 8cm Mortar platoon
...and if I get through that little lot in 3 months it will be a bloody miracle, but I figure 'aim high, and if you miss, you still hopefully hit fairly high"... Also still winging their way from Wayland Games in UK is a box of BF FoW - Panzergrenadier Command HQ ( 2 more half tracks and command teams), and a 10.5cm artillery battery boxed set and a bunch of loose 'fausts and 'shreks, just in case I manage to get through the above - yeah right who am I kidding!

I've made an (allowed) start - I have so far half assembled 1 halftrack (sitting on opened box in pic)... theres a lot of work ahead...

Also, (God it would have been so easy to cheat!), just tonight, I have finished painting, my second commando platoon pack, and the PSC Panzer IV H platoon... just need to varnish and base the commandos , and do the decals and varnishing of the panzers, so these guys are a current WIP - and not to be included in the Challenge. So this pretty much clears my painting table, ready for the off!

So what I am doing sitting here writing this, theres work to be done...

update 15/12/11:
The parcel arrived from Wayland Games, and the FoW Panzergrenadier HQ, and German 10.5 Artillery Battery , plus 'shreks & 'fausts have been added to the pile :-)

Analogue Hobbies Winter Painting Challenge


Well I have to say, I stumbled across Curt's challenge a little late, and thought I was too late to take part, but it seems I have been lucky enough to be allowed in at the last minute! :-)
More details of the event can be seen here at Curt's blog:
http://analogue-hobbies.blogspot.com/2011/12/gauntlet-dropped-2nd-annual-winter.html

I must confess I am not too worried about winning, but its nice to get involved in something on such an international level, and it will be an incentive to keep painting through the summer months, here in New Zealand (Southern Hemisphere and all that...).

Well, in terms of output, I've got some things going for me and some against. As it happens I have thoroughly got my WWII head on and Flames of War stuff is right at the fore of my painting projects.

So I have a pile of vehicles to do, which can of course be sprayed up fairly easily. But they are mostly Plastic Soldier Company stuff so do require a fair bit of assembly first...

Plus in the midst of the painting challenge I have my father, from the UK, visiting and staying with us for about 2-3 weeks, so I can't really be sitting painting while he's here, more likely I'll be sat up to the wee hours chatting and enjoying the odd dram or two of Glenmorangie and The Macallan whiskeys he'll be bringing with him ;-)

But no matter, I'm still in and will see what I manage to get achieved, by the deadline in March 2012.

The only thing is that things may get a bit quiet here on the blog, as the results can't be posted up anywhere till Curt has received them in March. So you may just have to put up with my inane whitterings and the odd battle-report and such in the meantime...

I'll try and keep things interesting here none-the-less, and good luck to all involved !

Monday, November 28, 2011

American Civil War - Confederate Battalion

I have finally finished that box of 36 Perry ACW 28mm figures, started oh so long ago! They have stared at me rather mournfully ever since I got started on that journey into Piracy ;-) I finally felt they deserved to be finished.
When I started the project they were just going to be for Black Powder gaming, but then I realised there may be some skirmish gaming opportunities for them also.

So I am pleased to present to you, a Confederate Battalion with Battle honours of Seven Pines & Manassas, upon their flags.


Firing Line
 Here above seen in all their glory in full firing line.

Skirmishers deployed
 Here above seen with skirmishers deployed. Having checked the Black Powder rules on such a Mixed order formation, it seems about a third of the unit should be deployed as skirmishers in this fashion, so thats 12 figures out of the full 36 figure set.

Full Skirmish Order
And here above in full skirmish order.

All the figures are based on nominally 20mm (but actually19mm) zinc plated steel washers. Being steel they are attracted to magnets, and so I made sabot bases from 3mm mdf sheet cut 40mm x 40mm. This was then covered with a layer magnetic paper, painted brown, and flocked to match the figures. As the figures are light weight plastic, the strength of the magnet works well, the base can be fully inverted and the figures don't fall off.
Mounted on magnetised sabot base

4 figures on a 40mm x 40mm sabot base.

Magnestised sabot base
The sabot base itself, flocked just enough to allow the washers contact with the magnetic layer.

The figures themselves I must admit, I took several short cuts in their painting, realising that with 'gerzillions' of figures for multiple periods still to paint, I had to try and get quicker.
So, I black undercoated, and then base coated all figures in their required 'mid tone'.
I then washed the entire figure in a 50/50 mix of Vallejo Dark Brown and Black wash.
I then worked back up the colours using the original mid tone colours.
I didn't do the eyes, just left them as a dark brown line in the eye socket recess.
Being plastic figures I only gave them one coat on Vallejo acrylic matt brush on varnish. I didnt bother with the polyurethane gloss, reasoning that the gloss was only really required for metal figures to resist chipping from the metal surface. Plastic figures don't require this.
The base was flocked with GW sand and this was just given a wash of Vallejo Dark brown wash. Normally I'd then drybrush lighter browns and cream colour to the sand, but didn't this time, content just to add the static grass.

I think the figures still look fine, and a lot of time and effort was saved. I am happy with the result.

So I can use my figures as originally planned for Black Powder as ACW troops.

I can also use them in full skirmish order for Rules with No Name, on Joe Harrison's Leadwood.

And finally, again as skirmishers, I can use them for some GASLIGHT gaming, whether as ACW themed troops, or perhaps as a Colonial force; the '1st FusilierAbteilung of Neu-Bavaria', to go alongside my planned Prussian themed VSF army.

So several uses out of one box of figures. More bang for your buck I say!

30/11/11
Second thoughts too: Using the washers also means I am no longer defacing Her Majestys currency, by using NZ10cent coins for bases, though oddly enough, the washers I bought are exactly the same size as the 10cent coin, yet have a hole in the middle (therefore less physical metal than the coin) and cost 21 cents each to buy... not sure what that says about the state of our economy? I wonder if  I might get any odd looks if I tried to pay for my lunchtime sarnie down at the cafe with a handful of washers....  'honest, they're worth more than the coins in your till !"  ;-)

Wednesday, November 09, 2011

Paint Grasshopper!

Paint Grasshopper…


Nope not him...

As a youngster, my dad often called me “grasshopper-minded”, as I would jump from one thing to the next that caught my interest and attention.

I now find that this commonly occurs while I am painting.

No matter what I sit down to paint, once I get started on it, I immediately start thinking about painting something completely different, which makes sticking on subject rather tricky.

I think its partly down to wargaming having so many periods and scales that can be played, and I want an army for ‘all of them’…

I also think, whilst painting is a leisure past-time, in reality its also a bit of a chore, its quite hard lengthy work (far easier to play with the figures than paint them after all!) to do a good job and satisfy yourself you’ve done as best as you could. So whenever I get to a tricky or fiddly bit in painting something, I immediately start thinking of something else that I perceive would be ‘easier’ to paint.

A ‘wee while’ ago I started painting up some Perry ACW figures, thinking they would be easy to do (compared to Napoleonics) – just shades of grey and brown for the ‘feds. Then I got inspired and distracted by all the pirate malarkey, which has been a fun interlude, and there’s more stuff there I like to add.

So having completed the current batch of ‘piratey’ stuff, I thought I’d better clear the painting table and complete the ACW figs which have been staring at me for months. Well I have pressed on admirably and blocked in all the base colours, and then came to painting in the fiddly straps and belts, and immediately I started thinking about painting Flames of War tanks…! (Just ordered some Plastic Soldier SdKfz 251’s and Panzer IV's, and some Battlefront Typhoons) They always seem easy. Heck, they're just 2 colours; the tank itself and the tracks. And the tank can be spray base coated…

Reality is they are just as time consuming and fiddly, when you have paint the commander and crews, the camo pattern, the stowage and then get the decals on right…

And I still have Black Powder armies for ACW, Napoleonics, and WSS (cavalry from WF on their way from Maelstrom) to finish & start! Oh and there’s still the WF Zulus to finish (first 5 test figures done – just got base them and varnish) and their Colonial Brit adversaries. Then the 6 Cowboys for 'Rules with No Name', and a whole pile of Prussians for my VSF project…

…and I’m not even going to mention the bunker that is the Lord of the Rings pile, that may well get some attention again if the Hail Sauron group kicks off, and I need to start building big ‘Hail-Caesar-style’ armies for LOTR (I’ve ordered the armies book for Hail Caesar too from Maelstrom – may give some ideas for the conversion work for Hail Sauron).

So a painting, period and scale grasshopper? Yep that’s me!

Thursday, August 18, 2011

Painting eyes - do you or don't you?

I agree painting eyes can be difficult and a little time consuming but if done well can really bring a model to life and make it 'pop'.

It is perhaps more suited to some of the more 'heroic scaled' 28mm figs, that have a decent amount of facial features sculpted in.

It does take practice and steady hand and a fine tip brush.

Here's a pic of what i do, its a bit crude but you get the idea:


1. block paint base flesh colour
2. give a wash of brown colour, this will define nose and eyes
3. paint a white line across eye, this is usually the easy bit. If you make it too wide, let if dry and brush over with a slightly darker tone to base flesh tone you used (to match the base flesh tone plus wash)
4. Now do a vertical black line through the middle of the eye, starting by resting brush tip on middle of eye brow, and drag downwards. I find this far easier than trying to stab a black dot in the centre of the white line with a brush tip that will deform as you do so. It also helps your aim and focus and fines out the brush tip as you drag downwards.
5. Now reduce the excess black line carefully brushing over with a slightly darker tone to base flesh tone you used.
6. Add highlights to face to finish.

I will agree, this can be hard depending on posture of figure, and other things getting in the way; bushy beards and eyebrows, hats and helmets, especially helmets with face guards... but its still possible...

Another trick I have heard about though not tried is dotting in the pupil using a cocktail stick


Educational resource:
Online art classes are available for people who love art.

Wednesday, May 27, 2009

Varnishing

A long overdue blog update, yet still a brief one.

I have grown a little frustrated at the "glossyness" of some of my most recent work, despite using a matt final finish varnish (Derivan Mattisse).

I have always used a brush on polyurethane gloss varnish from DIY stores for my first layer of varnish due to its better protection of the paintwork of the model figure. Yet I do hate the gloss effect, and have tried various matt finishes over the top.

I used to use Citadels spray Matt, but this disappeared from the shelves. What was on offer was their "Purity Seal", another spray but this was more a satin effect, with mixed results between sprayings.

I was recommended the Derivan product by a friend, and whilst this seemed to work initially, part way through the tin the matt effect seemed to disappear. And despite two coats of this matt varnish, my warg riders were as shiny as you can see in the pictures :-(

Then I got recommended another brush on varnish, this time from Vallejo (in Barcelona, Spain).
The product is their acrylic matt varnish. Available in two sizes ; 60ml code 26.518 (product bar code: 8429551265188) and a smaller 17ml size code 520 (product bar code; 8429551705202).

The larger size was a bit tricky to get hold of locally (in New Zealand) but the smaller size seems available at good hobby stores.

The product itself take a bit of nerve to use as its a bit like brushing on thinned PVA white glue! But spread evenly it dries transparent, and a further coat, 4 hours hours after the first, works excellently. I am very pleased with the results.

So much so that I subsequently spent an entire weekend re-varnishing my entire collection of painted Lord of the Rings figures.

See product image below:


I have subsequently been flat out painting more figures including ~ 30 Warriors of Rohan on foot, 6 Riders of Rohan, Gulavhar the demon of Arnor, a Mordor troll, giants spiders, bats, Shelob, Spider Queen, Orcs and Uruks, The Nine Ringwraiths on foot and several heroes. And have made the Deeping Wall for the Helms Deep Scenarios, and two scenic gaming boards...phew!

I will try and do some further blog updates with some pictures in the near future.

In the meantime time I have been thrilled to get the new War of the Ring hardback rulebook, and have enjoyed several games with this system.

I am very pleased with the game and its contrast to the skirmish game, which it compliments well, without superseding.

Saturday, September 09, 2006

Figure Painting

Painting miniature figures is an integral part of the wargaming hobby. Of course, how important it is to the individual wargamer varies from person to person. From one extreme you will have those who almost loath painting and are quite happy to use bare metal unpainted figures to enjoy their favourite game. To these players the game is more important than the figures themselves. At the other extreme, are those who are more collectors than wargamers and as such collect and paint figures to a high standard simply for their enjoyment of painting.
Most wargamers probably fall somewhere between these two extremes.

For myself, I enjoy the game play greatly, but want to do it with well painted figures, and preferably on a games table covered in well made terrain scenic items, so the whole display is visually appealing. In other words, I want my cake and eat it too!

I started painting many years ago as a young teen-ager, and at that time, I was very happy to turn out, what I would now call basic paint jobs.

Having come from collecting and making Airfix model planes and tanks and painting them up with their enamel range of paints, I started using this approach for my figure painting. Initial attempts were poor and the smelly paints and thinners were unpleasant to work with.

After starting buying and reading White Dwarf magazine and the Citadel Journal of the time, I gradually learned the GW way of painting! This involved a switch to using GW's citadel range of water based acrylic paints. This brought instantly better results, but I still had a long way to go. I currently use a range of paints from GW's citadel range, and also Foundry's own paint range.

Learning about the need for a suitable undercoat, and then varnishing and making decorative bases, all were gradually incorporated into the final figure.

But still these early figures were mostly flat tones, with little or no shading or highlight, and basic detailing at best. But it was a worth while exercise as it taught a sense of discipline to make a tidy and complete paint job.

Having mastered this basic technique, I gradually advanced and learned about dry-brushing, and using shading ink washes, and how to add detail effects to eyes, and belt buckles and such like.

I still had a long ways to go, as I still found it a little difficult to get a small enough detail to the eyes, they often looked somewhat cartoon like if the eye went too large.

Also, the ink process was quite lengthy and messy, the ink often running onto adjacent areas, and required tidying up once dry. Also dry-brushing aswell could be a messy technique as again the paint would often hit other areas of the model you didn't want it to, again requiring more time spent tidying up the model, once dry.

More recently I have switched to the so-called "Dallimore" method, as used by Kevin Dallimore of Foundry.

The idea here is to start the model painting from the shade colour up. After undercoating (black) then paint on the darkest shade of paint first, and once this has dried, add the next lighter shade and so on. Several layers of paint can be done in this way depending on level of detail required of the model figure, and the patience of the painter. Ideally you would use three layers; shade, mid tone and highlight. However for speed and quickness, and for the majority of "rank and file figures" two layers seem sufficient - the shade and mid tone. I sometimes bother with the final highlight layer on character models or individual figures I am just painting for fun.

Oh, before I forget, painting the eyes, I used to find it easier to do after the black undercoat, but now I do after the shading wash.

Here's a pic of what i do, its a bit crude but you get the idea:


1. block paint base flesh colour
2. give a wash of brown colour, this will define nose and eyes
3. paint a white line across eye, this is usually the easy bit. If you make it too wide, let if dry and brush over with a slightly darker tone to base flesh tone you used (to match the base flesh tone plus wash)
4. Now do a vertical black line through the middle of the eye, starting by resting brush tip on middle of eye brow, and drag downwards. I find this far easier than trying to stab a black dot in the centre of the white line with a brush tip that will deform as you do so. It also helps your aim and focus and fines out the brush tip as you drag downwards.
5. Now reduce the excess black line carefully brushing over with a slightly darker tone to base flesh tone you used.
6. Add highlights to face to finish.

I will agree, this can be hard depending on posture of figure, and other things getting in the way; bushy beards and eyebrows, hats and helmets, especially helmets with face guards... but its still possible...

Another trick I have heard about though not tried is dotting in the pupil using a cocktail stick.

My painting style continues to evolve over time, as I try different things. One of the things with painting figures well, is it take time, and when you have large armies to assemble, it can be quite daunting, so finding short cuts are appealing. Recently a product has become available called 'Army Painter' from Warlord Games. I have been intrigued to try this product, but also put off by several negative comments on the web.

Consequently I have stuck with a technique that I know works, and switched to a new product. When GW relaunched the 'washes', I found these excellent products, give a shade wash without a gloss sheen as their old inks used to. But this little pots are expensive. However I found Vallejo do these, at least brown and black in large economical pots, and the product is juts as good as the GW one.

So now my painting technique has evolved to use this product and can be summarized thus:

Prep model; File and trim
Black Undercoat spray and paint touch up
Block paint in base colours
Wash whole model with a 50/50 mix of Vallejo dark brown and black wash.
Do eyes
Build up tones again by repainting original base colour as a first highlight.
Then add final highlight
Add any detailing effects as required.
Do base; PVA glue (thinned) and add sand, and paint and highlight as required, and finish with static grass and other decorative foliage materials as required.

I find using this brown shade wash over whole model, seems to blend whole model together, in a satisfactory manner.

I am not going to win any 'Golden Demon' awards, but I am not concerned about that. I just want good tabletop standard figures to build armies as quickly as practicable.

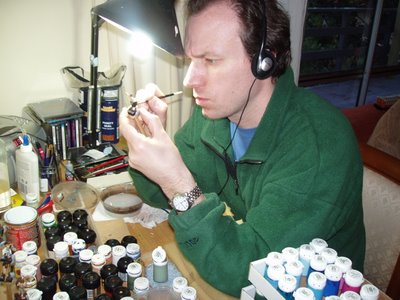
A couple of important points for novices - posture and lighting. The best posture I have found is elbows on the table and wrists locked together with model held at eye level.

Also, handling the figures can be made easier if you make some kind of prop to stick them to whilst painting. I have seen some folks use old empty paint pots. I made a bunch of 4" dowel rods with a 1" diameter circle of 5mm MDF wood on top (you can just see one in my hand as I paint the figure in picture below). I made an MDF wood base with holes drilled in to stand all these rods in.

And get a good angle-poise light and direct it down in front of you onto the model.

Musical accompaniment and a glass of your favourite tipple will not go a-miss. Earphones are optional!

Good luck!
Related Posts Plugin for WordPress, Blogger...