
On the terrain front:
I continued work on the causeway, widening the whole structure, by adding another layer of the styrofoam against each facing. I increased the length of the broken stairway section at the top, and then, after watching the movie footage again realised there was another turn and more stairs at the bottom... so I added another stair section and raised the whole by another ~ 6". I also started on the base board using some of the foam material that was packed with the Styrofoam delivery. This new pink material has a consistency very similar to that green spongy foam florists use for flower arranging... its very light weight and fairly soft and crumbly. However its going to get coated in Polyfilla so should hold up OK...

I also had tried etching in a brick pattern with a ball point pen. This process worked well ( a lot easier than the DAS clay etch of the Victorian Buildings though yielding a wider mortar join.). However after finishing a couple of facings I couldn't help think it made the whole thing look like a Victorian rail bridge structure... so I am going to skimcoat filler over the top and not bother with a brick pattern... I think if the filler goes on rough, painting and drybrushing should yield a good enough texture to it, making it look either hewn from the rock or with some kind of render applied by the dwarves...

With the rest of this pink foam, I cut it to 5" thick widths and used to make a raised board for the Bridge of Khazad Dum scenario. I'm going with the description for the scenario from the new The Hobbit rulebook, so a 4'x4' board with a 6" wide chasm across the middle...
Tins of paint weighting down the top sheet of 3mm MDF. The bottom sheet is my left over piece of 12mm MDF from the sheet used to make the Pirate Isle. I figured this thicker sheet would be best for the base of this structure to stop it flexing through the chasm area.

On the miniature painting front;
I have been steadily working through the Hobbit dwarves set and am nearing completion, but I'll hold off putting pictures up just yet as I feel they'll deserve a post of their own... However I did complete Haldir of Lorien, in among painting the dwarves, for the upcoming Lothlorien scenario;
 |
| Haldir of Lorien |
In gaming news;
Chris and I replayed the Hounds of Sauron scenario, using my tactical suggestion of backing the Fellowship up against the large rock just off centre of the board, and defending that area.
A heroic march to start, had the Fellowship pretty much in position on the first turn. Second turn had them aligned well as the Wargs caught them. Legolas climbed the rock to take up a firing position. And in rushed the Wargs. This time it was pretty much a breeze... none of the front rank defenders; Gandalf, Boromir, Gimli and Aragorn, ever had more than 2 wargs on them at any time, and Legolas was able to pick off wargs against Gandalf, who was probably the most vulnerable front rank fighter. The hobbits settled down to watch the show and the bodies of the wargs piled up...
 |
| Fellowship defends against the Hounds of Sauron |
16 Turns later, and we drew the Priority roll, ending the game... The Fellowship members had not lost a single wound, though possibly one fate point, I can't recall exactly... and they had butchered dozens of wargs and the Wild Warg Chieftain.
So I'd call that a success! Chris was whooping and cheering as the game went on ... so I was happy to see his spirits raised once more :-)
So next mission and on to Watcher in the Water...
Which brings us back to terrain matters, and tales of water woe!
I have used Woodland Scenics Realistic water, for a couple of past projects, including pouring the stream on the Helms Deep, Deeping Wall scenario, and when I made my Normandy Beach section. And for the most part it has worked well. So long as you pour it in thin layers and allow to dry between each pour...
Its a fairly clear liquid that pretty much self levels with each pour... and once dry is transparent with a glossy water sheen.

http://modelrailroading.wordpress.com/2009/01/31/open-the-floodgates-pouring-the-water-for-your-model-scenes/
If you read the page, you will see the author discusses an 'Identical' product to Realistic Water, that is much cheaper, and available through art stores. I was quite pleased with this find, and further finding the product available here in NZ, at roughly half the price of the WS product. So I ordered a pack of the Golden Acrylic, from Gordon Harris in Wello and it arrived 2 days later.

I cracked open the top, to find an opaque white product. Hmmm ok, well lets give it a go... Yep it poured out but it was very thick and was not self leveling, and had to be spread out with a spatula-like tool. It was still pretty thick after spreading, and not flat... 24hrs later with a fan blowing across it and its still white and wet... I am hoping like mad it will eventually dry out and go clear. Fingers crossed!!!
Another product I came across was this Magic Water... though it seems relatively expensive and I couldn't see a NZ based supplier so that would mean International shipping costs on top...

However, yet more Googling and I came across this video: (skip past the ad at the start)
This is just the sort of finish I want for my water areas, and what a great video find, to see how its done.
Not only that but looking at the cover of the Fellowship of the Ring Journey book, shows the same water finish effect there used for the Buckleberry Ferry scenario/diorama ;

So back to that video, and the product used to make the rippling water surface is Mod Podge:

More Googling and I found this stocked here in NZ at Warehouse Stationary... so I've bought a couple of packs. So if that Golden acrylic product ever dries, I'll be using this over the top to get the surface finish I am after!
Finally for today, and on the purchase scene I managed to grab a set of Minas Tirith Walls off Trademe. Now discontinued, this is now only going to be a 2nd hand purchase from Ebay or Trademe... So I was happy to find a set here in NZ for sale, so I didn't have to pay international shipping.

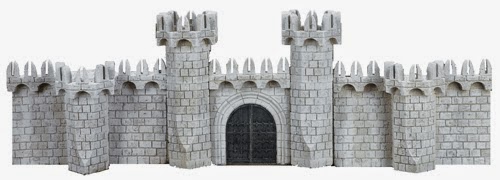
I'll use these sections as templates to make more sections from yet more Styrofoam... Now I've got a reason to get on with painting all those Warriors of Minas Tirith I have!
That's the thing with gaming Middle earth, there's so much to it, so many locations and differing Factions, you never get bored!
Till next time, dear adventurer, hold true to your purpose, and make sure you have some Lembas Bread or seed cakes about your person!
Wow, lots going on. I'm excited to see where your experiments wind up taking you.
ReplyDeleteI'm a bit jealous of your find. That's GREAT to see someone able to use those walls.
Its two days now and its still white, though patches seem to be drying through...
DeleteFor the moment Chris is gleefully using his plastic toy soldiers to fight over the MT walls, until I can get some WoMT painted up! The concern now is, I'll probably convince myself I'll need to make Grond! ;-)
How do you fit so much in? I was unsure of your idea for positioning the Fellowship there. I thought if they lost combats they would be likely to be trapped against the rock. Shows what I know!
ReplyDeleteI'm lucky I have an understanding wife, who largely lets me get on with it! Though must admit I had to mop all the floors yesterday ;-)
DeleteYes that was our first reaction the first time around playing this, not wanting to get trapped anywhere... but the reality is the 'front rank fighters' are all 3 attacks, (except Gandalf) against the wargs 1-2 depending how many can cram in, due to their larger 40mm bases... so the heroes were winning the duel rolls about 90% of the time, and when the didnt judicious use of a might point here and there, helped out, and if they still did lose, they've got fate points and multiple wounds to soak up the hits... Gandlaf was helped out by Legolas' Deadly Shot, shooting into combat, but even when that failed Gandalf still held his own in combat... I don't think he lost a duel roll the whole game!
How much did those walls set you back? I've seen them go for at least £115 on Ebay...
ReplyDeleteCan't wait to see the Dwarrowdelf finished! and the Watcher board for that matter
I got them $180NZ - I was lucky they were priced to sell. Me too, just wish the resin water would dry out!
DeleteAlso, I'm unsure but I believe the Wargs should be able to climb? It is after all quoted in the 'Making of the Two Towers' book: Powerful haunches and a dewclaw allowed the warg to climb. Just food for thought :)
ReplyDeleteMust admit I never considered the wargs as being able to climb... I always considered them a 'cavalry' models which don't tend to get the chance. I've gone back through the rule book and supplements and it doesn't seems to state whether they can or not, one way or the other... I think we'll just have to say this was a particularly steep cliff that only an elf like Legolas could hope to scale!
DeleteGreat progress good luck with water effect it seems quite a tricky thing to accomplish!
ReplyDeleteHaldir looks great and nice to hear Chris is back in the mood. I forgot how much a defeat can put you off a game when your that age!
Thanks ... 3 days in and still waiting for it to dry... :-(
DeleteThanks for that... Yes indeed, and at my age too! ;-)
5 days in, the surface has dried, but its still opaque white underneath...grrr! Think I am going to have to cut it out and redo the surface and re-pour an alternate water effect product - lesson to all, don't believe everything you read on the web! In this case "IDENTICAL" could not have been further from the truth... prat!
DeleteFor rivers and whatnot I use Vallejo Water Effects:Transparent Water. This is gel that goes on white and can be quickly manipulated with a lollypop stick or something similar to gives the impression of eddies. It does take about 48 hours to dry properly, although I've only ever used it in thin layers a few mm thick; it certainly wouldn't be any good for creating deep water effects, although some people put a layer of it over resin water etcetera to create waves.
ReplyDeleteThanks for that, I didnt know of the Vallejo product, though it sounds a little like what I have just used?
DeleteYou've been busy then! Great progress on the terrain build Scott, inspirational stuff.
ReplyDeleteThanks Michael :-)
DeleteThe stair way is looking great. I like the brickwork, you have etched into the styrofoam.
ReplyDeleteThanks, actually I wasn't too happy with the the etched brickwork myself... I am considering skimcoating over it, with filler...
DeleteBusy man!!! Keen to see how the water turns out!!
ReplyDeleteI know.... me too!
DeleteI'm not going to repeat all the above however I will add - excellent work on Haldir. I love the hand detail and you've got the eyes spot on. Hmmmm I need to practice flesh detail a little more I think!
ReplyDeleteThanks Ste, I think you do a fine job already!
DeleteGreat post as always.
ReplyDeleteCheers
Stefan
Thanks Stefan :-)
DeleteNow that is just shaping up cool Scott!
ReplyDeleteChristopher
Thanks, still a long ways to go!
DeleteKeeping busy Scott! Well done. Think you are right re the brickwork.
ReplyDeleteYeah, when I looked closely at the movie footage the 'bricks' used are actually the shape of the end of a bar of gold!
DeleteExcellent work on the causeway and i agree no etched stonework is need dwarvers are carvers not bricklayers. I've consider that crumbly pink stuff to be rubbish I hope you get more out of it than I have. Chris is becoming quite the little general!
ReplyDeleteThats kinda what I was thinking...
DeleteRe the pink stuff - thought I'd try using it as it was 'free' - I am thinking, once I have carved it as I want it, to thoroughly soak it through thoroughly in a watered down PVA glue mix, which, with it being rather porous will soak through and fix the whole with a little more strength - I hope! It just seemed a shame to biff it in the bin - which it would have filled anyway so I thought I'd try and use it some how!
Indeed!
How about just doing odd bits of exposed brickwork where the surface has come away with age? Saves you doing loads of it and the model becoming too busy but at the same time ads a bit of variety and interest here and there...
ReplyDeleteYes that's a good idea and one I have been think about...plus obviously lots of cracks and fissures with age etc... This part of the build is relatively easy and 'quick' ... it will be the little details that will take the time!
DeleteTextured Plasticard? Didnt know such a thing existed!
ReplyDeleteGreat to see progress ticking along. Good score with the set of Minas Tirith walls and Gate.
ReplyDeletecheers
Thanks Brendan, ticking along is indeed the word!
DeleteI put you down for a Blog Award here...
ReplyDeletehttp://dagamerstable.blogspot.com.au/2014/05/liebster-award-i-got-nominated.html
Cheers
Thank you for the nomination, though I am a little perplexed as I already have one (on my blog side bar)...do I have to 'do this' again?
DeleteFantastic work Scott. If you haven't seen them you should look up the Terranscapes videos on Youtube. He did a comparison of water products, including Mod Podge. I have some but have yet to use it.
ReplyDeleteThanks Sean. I think I have stumbled across a couple of their vids though dont recall the water effects one specifically... I'll go have a look, thanks again.
DeleteWow, good luck on all your projects. Tempted to try to something similar with that Minas Tirith set (think ruins of Arnor). Looking forward to your Dwarves, and Haldir certainly turned out great. As for water effects, I've tried all that other stuff, but with a little help from Dave Taylor found the stuff that works the best for me. You can read that story here:
ReplyDeletehttp://derfeldmarschall.blogspot.com/2011/07/lord-of-rings-demo-board.html
Thank you Jason. Just put finishing touches to Dwarves tonight so will hopefully get them on blog tomorrow...
DeleteThanks for the link, those boards worked out very well! Looks like another interesting product for me to check out...