Many moons ago, four gentleman gamers, (Myself, Roly - Dressing the Lines blog, Joe - Colonel o'Truths Miniatures Issues blog, and 'Notorious Greg' - no blog that I am aware of) got together with the notion of exploring the world of VSF, using the GASLIGHT rules.
More here for a recap...
http://scottswargaming.blogspot.co.nz/2011/08/foray-into-vsf.html
However, being the eclectic group that we are, much distraction appears to have ensued, as I disappeared off into the 15mm world of WWII gaming with Flames of War, and Roly has been on his Maori Wars odyssey using Sharps Practice. I'm not sure what Notorious Greg has been up to!
Of our quartet, only Joe stayed on target, and over the past 6 months or so has put together an amazing array of VSF scratch built goodness! More can be seen on his blog here:
http://colonelotruth.blogspot.co.nz/
So, I believe with a view to giving the rest of us a virtual 'thick ear', an impromptu meeting was called at Bowman Towers, where Joe brought all his recent creations for us to drool over, and become suitably inspired once again to get back on target...
Here's a pic of Joe's amazing collection, as Roly looks in amazement, and my son decided to buzz them with his planes. The enigmatic mysterious Notorious Greg can also be seen lurking nearby, minus a head, who is this 'masked man' I hear you ask...?
Roly had actually shown up to grab some dense foam from me to use as a base for his Maori Pa (that means 'fortified village' and not 'father'), the same stuff that Joe has recently used for his river board sections, though Joe had sourced his own.
So we all ogled Joe's handiwork, and probably all inwardly thought; "Christ, how the hell am I going to top that lot!"...
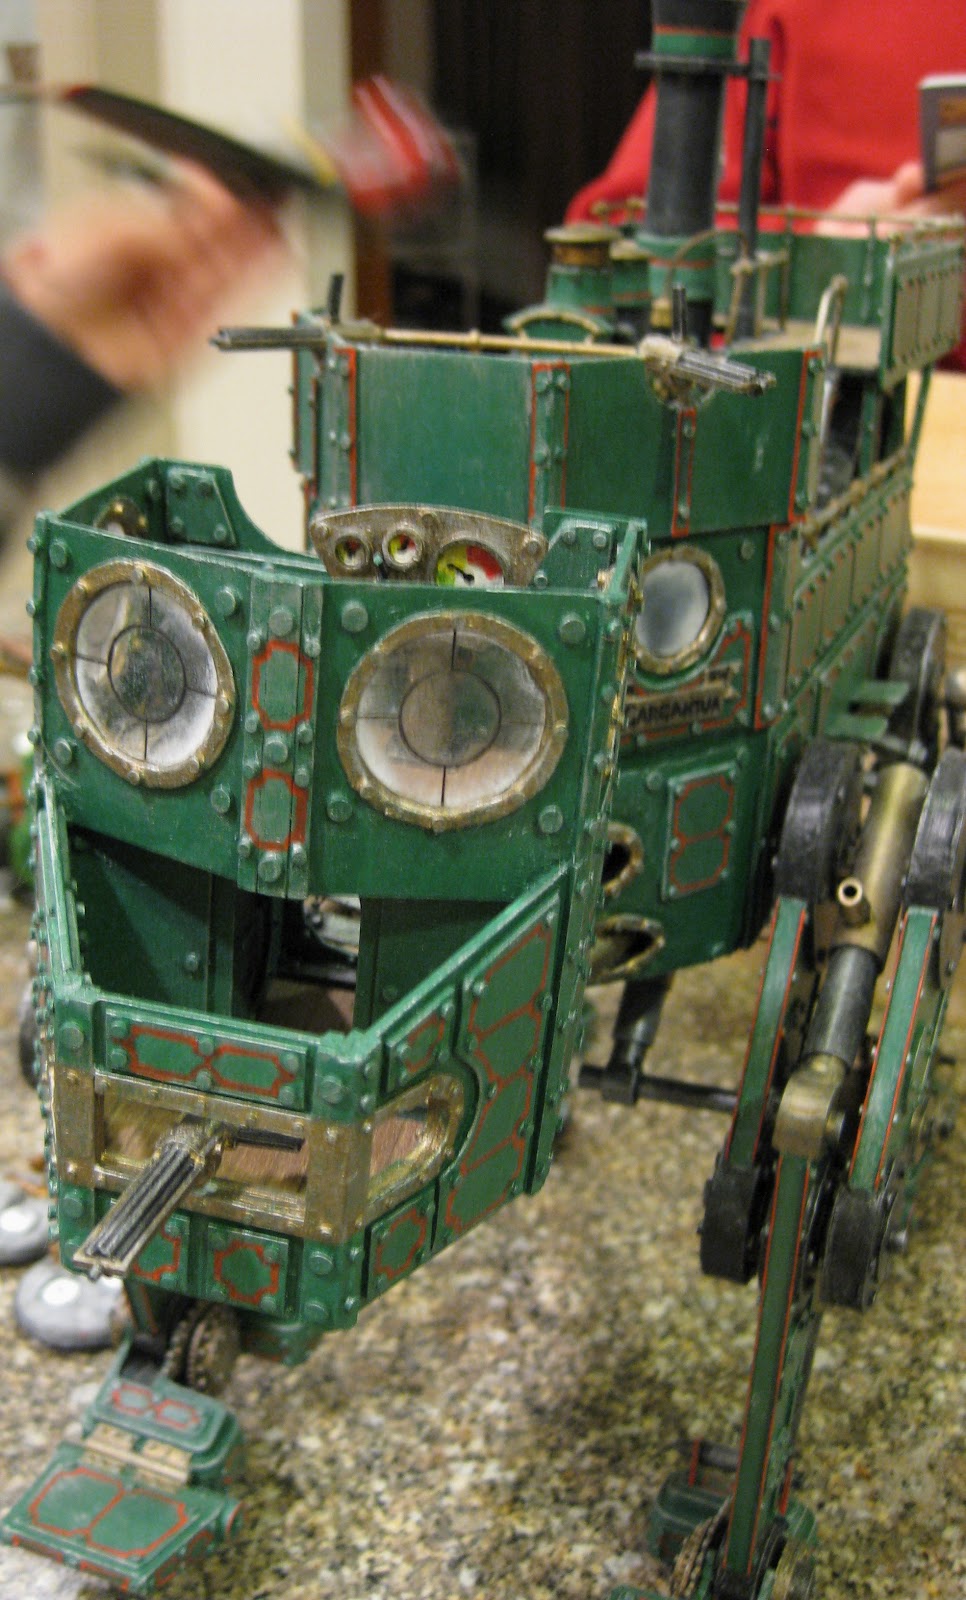
Above, Thomas the Tank engine meets Star Wars in a bizarre and suitable VSF twist, whilst below we can see a possible early prototype of the Dreadnaughts of a futuristic period set 40,000 years from now ;-)
And Gargantua herself, aptly named, this thing is massive! So suitably 'enthused' (read - brow beaten, chastised and sent to the naughty corner!), I promised to make some progress on the VSF world...
All those months ago I did place an order for the Paroom Station Prussians from BrigadeGames, but they arrived and languished in the 'to do' pile, as mountains of 15mm WWII goodies bypassed them to front of the painting queue...
My current batch of Late War WWII projects are nearing completion, and unless I suddenly feel the need to make an early start on MidWar Desert or Eastern Front stuff, I can take a WWII break, and have a crack on with these guys below (Don't worry Paul, I will get your Typhoon finished!)
So above is the first start on prep'ing those Paroom station Prussians. I must admit, when they first arrived their rifles were badly bent in the packs, and I was a little concerned they may just snap off as I tried to bend them back into position, but thankfully the quality of this pewter is rather good and they bent back no problem.
The first 12 figures trimmed, filed and glued to 20mm washers.
Now I have another slight dilemma...
I have used the word 'Prussian' a lot and also loosely thrown around the word 'Bavarian' too in connection with my proposed VSF 'dastardly huns'. I had not thought more about it, until several weeks ago, Roly pinged me an email with a specific uniform depiction for the Bavarian army. I had not realised they had a separate army! Of course, 'Germany' of the period was broken into many separate States...
The Prussian uniform would be a mid blue jacket with dark grey pants, whilst the Bavarian uniform, would be a light blue jacket and pants.
I'm undecided which way to go. I still like the idea of the Prussians, but the Bavarians would be a novel twist, and a lot easier to paint up with the airbrush!
I thought I might run a little poll, whilst I trim the remaining figures, to see what opinions are out there on the subject in the blog-o-verse...
Poll in side bar shortly. Thanks for voting!
Another discussion arose between us all about whats the difference between VSF and Steampunk, and some intersting thoughts and opinions were aired. I asked as I was thinking about making an Aeronef for for my VSF 'huns', but wondered if it would be appropriate for our setting...
I'd welcome your opinions on VSF vs Steampunk, and indeed is there actually any difference or is it just nomenclature???
Tuesday, June 19, 2012
Monday, June 18, 2012
XXX Corps - Guards Armoured - British Shermans - FoW
I have been working on these tanks for some time now, off and on between churning out the juggernaut that has become my Wehrmacht forces, of which it has been commented, Speer would have been proud of.. ;-)
The ten tanks are from 2 boxes of 5 Plastic Soldier Company, (15mm) Allied Shermans M4A2, which the Brits called the Sherman V.
These ten tanks give me an HQ of two Shermans, plus two platoons of 4 tanks each comprising 2 Sherman V's and 2 Sherman Fireflys, fitted with the British long barreled 17 pdr anti tank gun.
I have matched as best as I can the paint and decal scheme from the Hells Highway Supplement. I ran in to a couple of problems though. These plastic tanks are fractionally smaller than the BF ones, and the decals I have used are left overs from my original BF Sherman boxed set, and a new set of BF British decals I bought ages ago... The rear deck of the firefly hull is some what occluded from view due to the turret extension, and looking in the HH supplement they sported the Allied star on the turret top. The problem here was there was a lot of knobbly little details on the tops of these plastic tanks, which I was not confident the decals would lie smoothly over, even with decal softener.
The other decal problem was that even on the BF Shermans the Regimental markings and Guards markings were a tight fit on the hull front curved housing, and on these plastic tanks that area is even smaller, there was no way the BF decal was going to fit... so I left them off, having to be satisfied with the rear mounted ones only.. But other than the decal hassles I am very pleased with how these have come together and painted up.
I did use some of DOMs decals for the Tank numbers on the rear hull sides.
The Guards, differed from other tank companies, in having their platoon insignia on the hull sides and not on the turrets. So the picture on the cover of the Hells Highway books shows them correctly positioned, but the painted model examples in the books have them wrongly on the turret sides. But its a minor issue really. I'm mentioning it here just in case I get comments stating I haven't put the markings on the turret!
So these Shermans give me the core armoured force, I am busy adding finishing touches to JOE Vandeleur, and his forward air observer, and a Recce platoon consisting of Daimler I's and Dingos. Hopefully they'll feature in blog post soon.
So once XXX Corps is battlefield ready, I may break open that FireStorm Market Garden boxed set for a look see...
The ten tanks are from 2 boxes of 5 Plastic Soldier Company, (15mm) Allied Shermans M4A2, which the Brits called the Sherman V.
These ten tanks give me an HQ of two Shermans, plus two platoons of 4 tanks each comprising 2 Sherman V's and 2 Sherman Fireflys, fitted with the British long barreled 17 pdr anti tank gun.
I have matched as best as I can the paint and decal scheme from the Hells Highway Supplement. I ran in to a couple of problems though. These plastic tanks are fractionally smaller than the BF ones, and the decals I have used are left overs from my original BF Sherman boxed set, and a new set of BF British decals I bought ages ago... The rear deck of the firefly hull is some what occluded from view due to the turret extension, and looking in the HH supplement they sported the Allied star on the turret top. The problem here was there was a lot of knobbly little details on the tops of these plastic tanks, which I was not confident the decals would lie smoothly over, even with decal softener.
The other decal problem was that even on the BF Shermans the Regimental markings and Guards markings were a tight fit on the hull front curved housing, and on these plastic tanks that area is even smaller, there was no way the BF decal was going to fit... so I left them off, having to be satisfied with the rear mounted ones only.. But other than the decal hassles I am very pleased with how these have come together and painted up.
I did use some of DOMs decals for the Tank numbers on the rear hull sides.
The Guards, differed from other tank companies, in having their platoon insignia on the hull sides and not on the turrets. So the picture on the cover of the Hells Highway books shows them correctly positioned, but the painted model examples in the books have them wrongly on the turret sides. But its a minor issue really. I'm mentioning it here just in case I get comments stating I haven't put the markings on the turret!
So these Shermans give me the core armoured force, I am busy adding finishing touches to JOE Vandeleur, and his forward air observer, and a Recce platoon consisting of Daimler I's and Dingos. Hopefully they'll feature in blog post soon.
So once XXX Corps is battlefield ready, I may break open that FireStorm Market Garden boxed set for a look see...
Friday, June 15, 2012
Empire of the Dead..., and Depron foam
I have just come across this new game, Empire of the Dead, from West Wind Productions, and couldn't resist ordering a copy from Maelstrom Games...
More here from West Wind's website including a link to a free download of the basic rules and a demo starter scenario involving Jack the Ripper, Sherlock Holmes and Dr Watson...
http://www.westwindproductions.co.uk/catalog/empire_landing.php
Having read some of the reviews and battle reports in the blog-o-verse, its seems a game right up my (Victorian) street so to speak!
[Spookily enough, I spent most of youth growing up in a Victorian era terrace street, called unsurprisingly "Victoria Terrace"...]
It's a mix of Gothic Horror and Steampunk, in a Brittanic Victorian setting... what a wonderful combination!
I have always been a Gothic horror fan (though am not a fan of this recent craze of modern day lovey -dovey vampire nonsense...), and had long considered buying in to Chaos in Carpathia.
But other games as usual caught my attention or distracted me... I bought the GASLIGHT compendium last year, and though whilst I love the idea of its VSF world, have not done much with it as yet. And shortly after that I started on my current WWII Flames of War journey...
So when I spotted this game, combining Horror and Steampunk/VSF in a skirmish format, and in a gaming style with which I am familiar (it has been likened to the Legends/LOTR series of games), it seemed perfect.
It also brings the chance to getting back to making some 28mm scale terrain, which I always enjoy once I get my teeth into it. (no vampiric pun intended!)
However, one thing perturbed me; how to easily recreate those Victorian streets and all their brick buildings....
I have often seen buildings made from a dense foam sheet, where the brickwork is easily scored in, but I had never been able to find a source for this, what looked like, 5mm sheet. The closest I had come acorss was a 20mm thick sheet from a builders insulation product supplier, but this was still too thick to easily work with for anything but large structures like large castles and ruins made of 'big stone blocks'
Perusing though the Lead Adventure forum, I came across this wonderful thread by Overlord, on his modern day (1970s) themed 'The Sweeney' gaming ideas.
http://www.lead-adventure.de/index.php?topic=7181.60
As you can see he has created some wonderful modern style, yet probably harking back to Victorian times, buildings and structures, from this dense foam sheet.
After following back through a link on the first page of this thread, I finally found the name of the product used; Depron foam. A quick google search and lo and behold I find a supplier here in NZ!
The credit card was swiftly reached for and and order placed for some Depron Sheets.
Here's the link. for Kiwi's:
http://www.foamworks.co.nz/index.php?cPath=38
Here's the Depron foam sheet
Here's a shot from the LAF of Overlords Public House. Clearly this would also work in a Victorian setting and has enthused me to have a go!
I'll let you know how I get on once the book and sheet arrives.
More here from West Wind's website including a link to a free download of the basic rules and a demo starter scenario involving Jack the Ripper, Sherlock Holmes and Dr Watson...
http://www.westwindproductions.co.uk/catalog/empire_landing.php
Having read some of the reviews and battle reports in the blog-o-verse, its seems a game right up my (Victorian) street so to speak!
[Spookily enough, I spent most of youth growing up in a Victorian era terrace street, called unsurprisingly "Victoria Terrace"...]
It's a mix of Gothic Horror and Steampunk, in a Brittanic Victorian setting... what a wonderful combination!
I have always been a Gothic horror fan (though am not a fan of this recent craze of modern day lovey -dovey vampire nonsense...), and had long considered buying in to Chaos in Carpathia.
But other games as usual caught my attention or distracted me... I bought the GASLIGHT compendium last year, and though whilst I love the idea of its VSF world, have not done much with it as yet. And shortly after that I started on my current WWII Flames of War journey...
So when I spotted this game, combining Horror and Steampunk/VSF in a skirmish format, and in a gaming style with which I am familiar (it has been likened to the Legends/LOTR series of games), it seemed perfect.
It also brings the chance to getting back to making some 28mm scale terrain, which I always enjoy once I get my teeth into it. (no vampiric pun intended!)
However, one thing perturbed me; how to easily recreate those Victorian streets and all their brick buildings....
I have often seen buildings made from a dense foam sheet, where the brickwork is easily scored in, but I had never been able to find a source for this, what looked like, 5mm sheet. The closest I had come acorss was a 20mm thick sheet from a builders insulation product supplier, but this was still too thick to easily work with for anything but large structures like large castles and ruins made of 'big stone blocks'
Perusing though the Lead Adventure forum, I came across this wonderful thread by Overlord, on his modern day (1970s) themed 'The Sweeney' gaming ideas.
http://www.lead-adventure.de/index.php?topic=7181.60
As you can see he has created some wonderful modern style, yet probably harking back to Victorian times, buildings and structures, from this dense foam sheet.
After following back through a link on the first page of this thread, I finally found the name of the product used; Depron foam. A quick google search and lo and behold I find a supplier here in NZ!
The credit card was swiftly reached for and and order placed for some Depron Sheets.
Here's the link. for Kiwi's:
http://www.foamworks.co.nz/index.php?cPath=38
Here's the Depron foam sheet
![]() |
| Depron 5mm foam sheet |
![]() |
| 'Overlords' Public house from the Lead Adventure Forum |
Monday, June 11, 2012
Normandy Beach - Finished - FoW
I managed to get my Beach terrain finished over the weekend, adding white wave and foam effects using Woodlands Scenics Water Effects mixed with a little white paint.
With the retaining MDF strip cut away , I was then able to finish off the board, by edging with the black cloth duct tape.
I did have to use a little more white wave stuff than I wanted to at the shore line as when the main resin layer dried it had split in several places where its layer was thin. To conceal these splits I covered it in the white wave effect mix.
I guess we'll just have to imagine a rough day at the sea, with crashing waves and roaring surf... and from what I have read about the landings, on 6th June '44, the weather was still far from ideal...
Here also you can see the how the seawall sections can be added. They are on lolly (iceblock) sticks (coffee stirrers - call them what you will!) in roughly 6" lengths, so the amount of seawall and where its exit point is, can be varied.
These seawall sections will also nicely conceal the join between the beach section and the main board when placed together, side by side.
So there you have it, the beach is ready for an invasion!
I have ordered some landing craft from Skytrex, some French style buildings from Kerr & King, and have one more bunker to make to complete the defences, a 5cm kwk defilade bunker.
I hope to demo this game at Kapiti Wargames Club exhibition day on 15th July, though I hope to get a practice game in beforehand to see how the beach assault rules work from the D-Day supplement...
I did have to use a little more white wave stuff than I wanted to at the shore line as when the main resin layer dried it had split in several places where its layer was thin. To conceal these splits I covered it in the white wave effect mix.
I guess we'll just have to imagine a rough day at the sea, with crashing waves and roaring surf... and from what I have read about the landings, on 6th June '44, the weather was still far from ideal...
Here also you can see the how the seawall sections can be added. They are on lolly (iceblock) sticks (coffee stirrers - call them what you will!) in roughly 6" lengths, so the amount of seawall and where its exit point is, can be varied.
These seawall sections will also nicely conceal the join between the beach section and the main board when placed together, side by side.
So there you have it, the beach is ready for an invasion!
I have ordered some landing craft from Skytrex, some French style buildings from Kerr & King, and have one more bunker to make to complete the defences, a 5cm kwk defilade bunker.
I hope to demo this game at Kapiti Wargames Club exhibition day on 15th July, though I hope to get a practice game in beforehand to see how the beach assault rules work from the D-Day supplement...
Saturday, June 09, 2012
FoW - Operation Sealion - AAR - The Pincer that never was...
Last night Brett, Paul and I played our third game in our Operation Sealion campaign.
To set the scene for the report I thought I would briefly recount the prior two games...
Our campaign kicked off a few weeks ago. I'd hoped to launch it as a beach assault scenario, but my beach terrain was not finished in time, so instead we came up with an idea to play a game where the setting for the game was a German panzer force has landed at the beaches with minimal resistance and has pushed inland and is heading to capture a village.
The village was held by a mixed force commandos and paras and Yanks, with Allied forces rushing to help. To hinder this support arriving, German FJs had landed in the Allied rear areas. So we had two games going at once, the main battle and with a smaller side battle.
This was great fun and kept all three players busy, from the start. The mission was thus a variation on Hold the Line/No retreat. As it turned out my small German FJ force didn't have much hope of stopping the reserves arriving but did hinder them enough to delay their arrival, and knock off a few elements. I was very wary of assaulting my panzers into a village held by paras, with gammon bombs and yanks with bazookas, but with a bit goading, and instruction from the more experienced player, I was 'schooled' in how to make a successful assault capture the objective.
It was very good because I finally got to fully understand the assault phase and the '8" bubble'. So a win for the Germans in Game one.
Game two, saw a German advance to the next village, in which British forces were dug in, this time using the Cauldron scenario. 500 points of Brits had to hold on for 3 turns against an assault by a mechanised armoured infantry company (Panzer Lehr), until Yank armoured reserves arrived to save the day...
I got so enthused by the idea of crushing this meagre force of Brits holding out against me, I ended up stacking nearly all my forces in one quadrant, I was determined to outnumber my enemy somewhere and overwhelm him.
This I did but my troops actually got in each others way, and whilst the assault was successful in capturing one half of the village, I lost the chance to capture both sides at once, which could have been quite possible (another lesson learned). In the end my assault bogged down... a couple of fluffed motivation rolls to unpin etc... It gave the Brits just enough breathing space to hang on, and the Yanks armour arrived to save the day in true cavalry charge style, though it has to be said they got a bit of a shock to start with when all the arriving platoons shots missed, and the return fire from 3 panzer IVs wrecked a platoon of Shermans. But the good luck of the 3 panzers couldn't last and eventually they were overwhelmed.
Another fun game and more stuff learned once more. So allies win Game two.
On to Game three... I had found the opening game (two games in one) very entertaining and decided to replicate this idea.
The scenario was that after their loss the Germans pull back to reorganise their forces. The Allied forces push on to keep the pressure on the Germans, and attack with what forces they have in the area, a Commando Company. The German 'second wave' seeing what happened to their premier Lehr forces in the last battle are a little de-motivated and not first line troops anyway. Brett wanted to try out a force from his new book Blood Guts and Glory, and also for a change of pace wanted to try playing the Germans, so his forces were Reluctant Trained.
I set the main game as Pincer of approx 1200 points each, with a side game of Free for All, of 600 points of armoured forces facing each other, the idea being Allied armoured elements trying an outflanking manoeuvre, running into German armoured elements rushing to aid their beleaguered comrades. The victor of the armoured game would be able to bring what was left of their forces onto the main battle from the turn after they win their side game. So here's some pictures from our game last night.
The side game; 4 Brit Shermans and 2 M10s, vs German armour including cannon halftracks, AA halftracks and Panthers (proxied by Stugs)
The main force deployments pictured from the Allied side. The Germans are actually a mechanised company dismounted and dug in. Technically the Brits should have been defending, but we were playing a scenario for the campaign so anything goes!
Commandos eager for the off...
The stalwart German defenders, this doesn't look much does it? The Allies should brush this aside no problem...
OK first dice roll of the game, things start going wrong for the allies... the wind direction was not in our favour... our smoke and pin idea lost a bit of its umph! But the allies advance as best as they can expecting artillery to start wrecking the German forces. Sadly our naval guns ranged in but missed the panther in the open, and the paras battery did minimal damage to the dug in Germans.
On the side show, M10s deploy...
As do the Brit Shermans, who move up to take some meagre cover from a hedge covering one objective. At this point I went to make some tea... (does that sound British?)...
...when I returned the Panthers had wrecked the platoon, but the last tank passed its motivation!
Now Brett is never one to hold back...even on the defensive... having seen our artillery whiff, and faced with a bunch of fearless veteran troops in the open... he called up his halftracks , remounted and advanced, and deployed his ambushing half track cannon platoon, and let rip... it wasn't pleasant... sadly my Allied para commanders saving rolls for my commando were not the best, and brave men started falling. After this the Allies dug in, hoping to weather the storm of machine gun fire and wait till our artillery changed the course of the battle. The commandos in the marsh failed to dig in repeatedly, obviously the ground was too soft, and they paid the price over subsequent turns...
Back to the side show and the M10s bring the hurt to the German halftracks
Whats left of the marsh dwelling commandos...it aint looking good...
The panthers, having witnessed naval shells landing all round them, push forward to assault the end of the allied line held by a para platoon.
Back to side show, the Panthers at the double forward to 'claim' the objective, but fall to the M10s who reposition for side shots...
The panthers win the fight, losing one tank...
It was at this point that Brett spotted a crucial problem to our plan; waiting for our artillery to wreck the Germans and allow us to advance... we needed to be beyond the half way point of the board by turn six or we would automatically lose! Paul and I had lost sight of this small detail, and paid the price...
Brett pulled all his forces into line to prevent the Brits advancing. The side show had developed into just that, and wasn't going to influence the main battle either way now.
Paul and I managed one last assault to try and break through on our right flank, and got smoke and artillery to work and managed to attack and wreck some of the German defenders but it was not enough and the counter attacking Germans managed to defuse this thrust.
A last what the hell charge followed up the centre, which was as expected thrown back by defensive fire...
And that was it, the Germans hold on and win.
It is often said in tactical discussion that dice luck should not come into it if you plan correctly. Would somebody tell the dice that. Our artillery was terrible... and the so called 'Reluctant' Germans were anything but, passing nearly all key motivation tests with aplomb and only a few bailed halftracks refused to remount...
Still it was a great fun game, that at times still felt could have gone either way.
I look forward to the next game, getting back to command Panzer Lehr, I need the practice for Call to Arms!
Our campaign kicked off a few weeks ago. I'd hoped to launch it as a beach assault scenario, but my beach terrain was not finished in time, so instead we came up with an idea to play a game where the setting for the game was a German panzer force has landed at the beaches with minimal resistance and has pushed inland and is heading to capture a village.
The village was held by a mixed force commandos and paras and Yanks, with Allied forces rushing to help. To hinder this support arriving, German FJs had landed in the Allied rear areas. So we had two games going at once, the main battle and with a smaller side battle.
This was great fun and kept all three players busy, from the start. The mission was thus a variation on Hold the Line/No retreat. As it turned out my small German FJ force didn't have much hope of stopping the reserves arriving but did hinder them enough to delay their arrival, and knock off a few elements. I was very wary of assaulting my panzers into a village held by paras, with gammon bombs and yanks with bazookas, but with a bit goading, and instruction from the more experienced player, I was 'schooled' in how to make a successful assault capture the objective.
It was very good because I finally got to fully understand the assault phase and the '8" bubble'. So a win for the Germans in Game one.
Game two, saw a German advance to the next village, in which British forces were dug in, this time using the Cauldron scenario. 500 points of Brits had to hold on for 3 turns against an assault by a mechanised armoured infantry company (Panzer Lehr), until Yank armoured reserves arrived to save the day...
I got so enthused by the idea of crushing this meagre force of Brits holding out against me, I ended up stacking nearly all my forces in one quadrant, I was determined to outnumber my enemy somewhere and overwhelm him.
This I did but my troops actually got in each others way, and whilst the assault was successful in capturing one half of the village, I lost the chance to capture both sides at once, which could have been quite possible (another lesson learned). In the end my assault bogged down... a couple of fluffed motivation rolls to unpin etc... It gave the Brits just enough breathing space to hang on, and the Yanks armour arrived to save the day in true cavalry charge style, though it has to be said they got a bit of a shock to start with when all the arriving platoons shots missed, and the return fire from 3 panzer IVs wrecked a platoon of Shermans. But the good luck of the 3 panzers couldn't last and eventually they were overwhelmed.
Another fun game and more stuff learned once more. So allies win Game two.
On to Game three... I had found the opening game (two games in one) very entertaining and decided to replicate this idea.
The scenario was that after their loss the Germans pull back to reorganise their forces. The Allied forces push on to keep the pressure on the Germans, and attack with what forces they have in the area, a Commando Company. The German 'second wave' seeing what happened to their premier Lehr forces in the last battle are a little de-motivated and not first line troops anyway. Brett wanted to try out a force from his new book Blood Guts and Glory, and also for a change of pace wanted to try playing the Germans, so his forces were Reluctant Trained.
I set the main game as Pincer of approx 1200 points each, with a side game of Free for All, of 600 points of armoured forces facing each other, the idea being Allied armoured elements trying an outflanking manoeuvre, running into German armoured elements rushing to aid their beleaguered comrades. The victor of the armoured game would be able to bring what was left of their forces onto the main battle from the turn after they win their side game. So here's some pictures from our game last night.
The side game; 4 Brit Shermans and 2 M10s, vs German armour including cannon halftracks, AA halftracks and Panthers (proxied by Stugs)
The main force deployments pictured from the Allied side. The Germans are actually a mechanised company dismounted and dug in. Technically the Brits should have been defending, but we were playing a scenario for the campaign so anything goes!
Commandos eager for the off...
The stalwart German defenders, this doesn't look much does it? The Allies should brush this aside no problem...
OK first dice roll of the game, things start going wrong for the allies... the wind direction was not in our favour... our smoke and pin idea lost a bit of its umph! But the allies advance as best as they can expecting artillery to start wrecking the German forces. Sadly our naval guns ranged in but missed the panther in the open, and the paras battery did minimal damage to the dug in Germans.
On the side show, M10s deploy...
As do the Brit Shermans, who move up to take some meagre cover from a hedge covering one objective. At this point I went to make some tea... (does that sound British?)...
...when I returned the Panthers had wrecked the platoon, but the last tank passed its motivation!
Now Brett is never one to hold back...even on the defensive... having seen our artillery whiff, and faced with a bunch of fearless veteran troops in the open... he called up his halftracks , remounted and advanced, and deployed his ambushing half track cannon platoon, and let rip... it wasn't pleasant... sadly my Allied para commanders saving rolls for my commando were not the best, and brave men started falling. After this the Allies dug in, hoping to weather the storm of machine gun fire and wait till our artillery changed the course of the battle. The commandos in the marsh failed to dig in repeatedly, obviously the ground was too soft, and they paid the price over subsequent turns...
Back to the side show and the M10s bring the hurt to the German halftracks
Whats left of the marsh dwelling commandos...it aint looking good...
The panthers, having witnessed naval shells landing all round them, push forward to assault the end of the allied line held by a para platoon.
Back to side show, the Panthers at the double forward to 'claim' the objective, but fall to the M10s who reposition for side shots...
The panthers win the fight, losing one tank...
It was at this point that Brett spotted a crucial problem to our plan; waiting for our artillery to wreck the Germans and allow us to advance... we needed to be beyond the half way point of the board by turn six or we would automatically lose! Paul and I had lost sight of this small detail, and paid the price...
Brett pulled all his forces into line to prevent the Brits advancing. The side show had developed into just that, and wasn't going to influence the main battle either way now.
Paul and I managed one last assault to try and break through on our right flank, and got smoke and artillery to work and managed to attack and wreck some of the German defenders but it was not enough and the counter attacking Germans managed to defuse this thrust.
A last what the hell charge followed up the centre, which was as expected thrown back by defensive fire...
And that was it, the Germans hold on and win.
It is often said in tactical discussion that dice luck should not come into it if you plan correctly. Would somebody tell the dice that. Our artillery was terrible... and the so called 'Reluctant' Germans were anything but, passing nearly all key motivation tests with aplomb and only a few bailed halftracks refused to remount...
Still it was a great fun game, that at times still felt could have gone either way.
I look forward to the next game, getting back to command Panzer Lehr, I need the practice for Call to Arms!
Tuesday, June 05, 2012
Wehrmacht reinforcements - FoW
More reinforcements completed this weekend, thanks to a long 3 day weekend, honouring the Queens 60th Jubilee, good on yer mum! God bless her!
However it does seem slightly controversial, offering up German troops, on a British occasion ;-)
First up, Battlefronts Jagdpanther platoon of three 'tank hunters'. Now these don't really fit with my Panzer Lehr forces, but this to me is one of those WWII vehicles that just presses all the right buttons...
As a kid I had a toy die-cast one of these, that was more or less scaled to go with my Airfix toy soldiers. It also had a push in sprung barrel, that then fired a little red plastic 'shell'. I had endless fun with it, lining up my soldiers and shooting them all down :-) The only difference to these, apart from the scale, is I think it was eastern front themed with a grey/white colour scheme.
There is something just 'menacing' about these armoured fighting vehicles.... I hesitate to use the word 'tank', as they characteristically, don't have a turret. A massive 8.8cm gun (the same as fitted to the King Tiger), which could knock out any allied tank, and a huge sloping armoured bow plate, which you can clearly imagine any allied tank shells just bouncing harmlessly off... These things must have been quite a terrifying prospect for allied tankers to come up against!?
From what reading I have found, only 12 jagdpanthers made it to participate in the Normandy campaign, though many more fought on the eastern front. So my reasoning for adding these to my forces, was that once the allies break through my Normandy coast defenders, elements of 326th Grenadier forces will be the next line of defense, and they get these tank hunters as a support choice. Can't wait to try them out...
The jagdpanthers are a cast resin hull, with metal tracks, barrels and other detailing. There was quite a bit of stowage options as extras in the box, but to be honest the resin hull already had a load of stowage cast on them, so I saw no need to further 'clutter' the hulls.
Painted in a German late war colour scheme, base of dunkelgelb, and broad stripes of green and brown, which when shade washed and then drybrush highlighted up, blend together quite well.
The Decals are by DOM. The BF box does include decals but I have found their German decals to be rather poor, with the black and white of the black crosses and tank numbers poorly aligned, as was the case when I tried the ones in the set.
Next up, some Opel Blitz 3 ton trucks. I originally bought these to be used as an optional portee mount for the 3.7cm FlaK guns I finished recently. But in reality the gun base plate would not fit in the rear truck flatbed, without cutting off the sides, which I didn't want to do. So in the end I kept the trucks as is. No doubt they will come in useful.
I can use them as transport for my panzergrenadiers, or perhaps as a supply truck for pioneers. They were widely used by the Germans, where mechanised transport was a priority. I could even just use them an objective marker...
Although not too clear from the pictures, there is a driver in the cab, who had to be painted first and glued into place before the cab roof was glued down. The rear canopy was an optional fit.
Next up a quick shot of another, and I think, last Panzerfaust command team I need for my Lehr panzergrenadiers.
The last platoon for today, is a Motorcycle and side-car BMW recce platoon. These are another of those iconic features of Wehrmacht forces, another image from my youth watching all those WWII war movies, just about every one of these movies had these motorbike teams roaring about.
They were used extensively throughout the war, and here are depicted in their late war colour scheme.
I have come to realise just how important recce troops are in the game, being able to scout ahead of the army's main forces, checking out likely ambush locations, and spotting hidden enemy troops, reporting their positions and thus making it easier to target them by your main force elements, thanks to the 'eyes & ears' rule.
Given the chance, once the recce role is complete they can also be used to quickly threaten exposed objectives. They each also sport an MG and can spit out a fair amount of fire power, for such a small size platoon. They can also dismount as required at which point they would need to be substituted by separate infantry teams.
A word of warning, they were a bit of a bugger to put together! All the crews come separate from the bike and the bike and side-car are also separate pieces from each other. But the worst bit was the fact that the 'drivers' arms and handlebars were also a separate piece, so you had to glue the drivers body to the bike, hopefully at the right angle, then glue the arms/handlebars into place between the two. Very fiddly! I spent a fair bit of time super-gluing my fingers together!
But my patience paid off, and I am pleased with how they have turned out. I look forward to trying them out properly sometime soon.
Finally for today, more WIP shots of my Normandy Beach. Another two bottles of Woodland Scenics water resin arrived in the mail over the weekend and these have been coloured and poured. I think its just about where I want it now, though I am tempted to add another bottles worth of resin before adding final wave effects.
Regards
Scott
First up, Battlefronts Jagdpanther platoon of three 'tank hunters'. Now these don't really fit with my Panzer Lehr forces, but this to me is one of those WWII vehicles that just presses all the right buttons...
As a kid I had a toy die-cast one of these, that was more or less scaled to go with my Airfix toy soldiers. It also had a push in sprung barrel, that then fired a little red plastic 'shell'. I had endless fun with it, lining up my soldiers and shooting them all down :-) The only difference to these, apart from the scale, is I think it was eastern front themed with a grey/white colour scheme.
There is something just 'menacing' about these armoured fighting vehicles.... I hesitate to use the word 'tank', as they characteristically, don't have a turret. A massive 8.8cm gun (the same as fitted to the King Tiger), which could knock out any allied tank, and a huge sloping armoured bow plate, which you can clearly imagine any allied tank shells just bouncing harmlessly off... These things must have been quite a terrifying prospect for allied tankers to come up against!?
From what reading I have found, only 12 jagdpanthers made it to participate in the Normandy campaign, though many more fought on the eastern front. So my reasoning for adding these to my forces, was that once the allies break through my Normandy coast defenders, elements of 326th Grenadier forces will be the next line of defense, and they get these tank hunters as a support choice. Can't wait to try them out...
The jagdpanthers are a cast resin hull, with metal tracks, barrels and other detailing. There was quite a bit of stowage options as extras in the box, but to be honest the resin hull already had a load of stowage cast on them, so I saw no need to further 'clutter' the hulls.
Painted in a German late war colour scheme, base of dunkelgelb, and broad stripes of green and brown, which when shade washed and then drybrush highlighted up, blend together quite well.
The Decals are by DOM. The BF box does include decals but I have found their German decals to be rather poor, with the black and white of the black crosses and tank numbers poorly aligned, as was the case when I tried the ones in the set.
Next up, some Opel Blitz 3 ton trucks. I originally bought these to be used as an optional portee mount for the 3.7cm FlaK guns I finished recently. But in reality the gun base plate would not fit in the rear truck flatbed, without cutting off the sides, which I didn't want to do. So in the end I kept the trucks as is. No doubt they will come in useful.
I can use them as transport for my panzergrenadiers, or perhaps as a supply truck for pioneers. They were widely used by the Germans, where mechanised transport was a priority. I could even just use them an objective marker...
Although not too clear from the pictures, there is a driver in the cab, who had to be painted first and glued into place before the cab roof was glued down. The rear canopy was an optional fit.
Next up a quick shot of another, and I think, last Panzerfaust command team I need for my Lehr panzergrenadiers.
The last platoon for today, is a Motorcycle and side-car BMW recce platoon. These are another of those iconic features of Wehrmacht forces, another image from my youth watching all those WWII war movies, just about every one of these movies had these motorbike teams roaring about.
They were used extensively throughout the war, and here are depicted in their late war colour scheme.
I have come to realise just how important recce troops are in the game, being able to scout ahead of the army's main forces, checking out likely ambush locations, and spotting hidden enemy troops, reporting their positions and thus making it easier to target them by your main force elements, thanks to the 'eyes & ears' rule.
Given the chance, once the recce role is complete they can also be used to quickly threaten exposed objectives. They each also sport an MG and can spit out a fair amount of fire power, for such a small size platoon. They can also dismount as required at which point they would need to be substituted by separate infantry teams.
A word of warning, they were a bit of a bugger to put together! All the crews come separate from the bike and the bike and side-car are also separate pieces from each other. But the worst bit was the fact that the 'drivers' arms and handlebars were also a separate piece, so you had to glue the drivers body to the bike, hopefully at the right angle, then glue the arms/handlebars into place between the two. Very fiddly! I spent a fair bit of time super-gluing my fingers together!
But my patience paid off, and I am pleased with how they have turned out. I look forward to trying them out properly sometime soon.
Finally for today, more WIP shots of my Normandy Beach. Another two bottles of Woodland Scenics water resin arrived in the mail over the weekend and these have been coloured and poured. I think its just about where I want it now, though I am tempted to add another bottles worth of resin before adding final wave effects.
Regards
Scott
Subscribe to:
Posts (Atom)