Showing posts with label Cart. Show all posts

Monday, May 26, 2014

Continued Middle-Earth machinations...

More gradual work this weekend on the Causeway...

It's now glued to the base, and the main upright glued to the stair. I've started cutting out gullies into the base to further give the impressive of height in the stair columns. This has also allowed me to fashion the stony bridge section from bottom of the stairway across gully there.


I have decided I am going to make it corner-centric, and am going to back the structure in MDF and along its left side, so I can effect a rocky corner area, into which a gallery with pillars will be cut, for the goblins to shoot down from at the Fellowship as they flee down the stairs...as per movie...


I've also started cladding the lower areas in off-cut broken bits of poly I had left over... just to start to build up the structure and give it some texture...

I left it with the smaller side panels of MDF gluing , to give the base more strength...

I am still pondering how best to model flames and smoke in the gullies...

-----o0o-----

So while that was drying I moved back on the the Khazad Dum board... I attacked the surface of the pink foam stuff with a box cutter knife, and quickly effected a rocky surface. In that respect this material is very easy to work with.


I then also started to clad the sides of the board with more MDF, again for structural strength of the board.... and left that drying too... one side at a time as the PVA glue dries... though had to re-clamp down the end top surface to get a better fit after further trimming down the end piece of foam.

-----o0o-----

Back to modelling, and I decided that my Hobbit ale cart drivers would probably want a little comfort for their journey, so I fashioned a broad cushion out of greenstuff for the seat. This actually allowed me to push the hobbits into it, to allow their seating posture and angle to look better, more upright... I've also based the cart on a 60mm MDF round base, 3mm thick, and sand textured it.


And showing the hobbits in place. I plan to paint the cart and hobbits separately, and glue the hobbits into place at the end. This will allow me to try and freehand some words on the cart plaque behind their seat. That's the bit I am not looking forward to as my freehand skills are not the best...


-----o0o-----

Oh, and if you hadn't guessed, I've also moved on to the next model painting requirement for the Fellowship campaign; the Uruk-Hai Scouts... a boxed set of 24 plastic figures up first for starters... I've also got a handful of metal ones and Lurtz in the stripping jar from 2nd hand purchases... and am thinking of getting Vrasku and Mahur done at the same time, while I am working on the Uruks...


Making steady progress with these guys... they are fairly easy to do - dark armour, shades of brown and gray throughout and the majority wear full face helmets so no having to spend ages getting the faces right!

-----o0o-----

Back to terrain and the Watcher board, and my tales of woe... I am frustrated to heck that the bit I had expected to be the easy bit to finish it off, pour the water... has caused the most grief!

The Golden brand acrylic resin had dried but not clear, it was still opaque white over most of the water area. I am guessing this has either been because the layer applied was too thick or there was too much humidity as it dried, or both. To try and fix this I decided to try heating it with a heat gun... Whilst at first I thought this was going to work, suddenly the resin ballooned up off the surface, then shrank back down as heat was removed, drying in an awful wrinkly mess...

I let it dry, then tried peeling off the top surface, cutting slits in it and peeling bits back... then one piece came away thickly, lifting the whole resin thickness, exposing the base foam layer underneath... "Bollox!" I thought, and pulled... and the whole lot came off... back to square one!

So I have resurfaced this foam base in paint and glue to seal it, added pebbles and gravel and twigs to effect fallen logs, branches in the water etc...

Having watched again some of the Terranscape videos on Youtube, I have ordered some Envirotex Lite and some colouring pigment translucent dyes, and some Liquitex Gloss Gel Medium. The first product is poured in layers to effect water depth. The last product will effect a wavy surface ripple.

I am going to keep the Mod Podge for the river sections and redo those with a more realistic surface texture - I hope!

With luck I may have the Watcher Board finished for next weekend... fingers crossed!

PS - Bugger, just checked the stash - I don't have Vrasku afterall! Another one to source...

Saturday, May 10, 2014

Middle-Earth medley... Wood Elves, Ale Carts and Durin's Causeway...

A bit of a mixed bag this blog post...

First up... I finished the four Wood Elf models that were part of Tim's transpacific parcel of goodies I previously received. Tim had used them as a paint test scheme I believe, and whilst perfectly serviceable, I wanted them to match in with my existing figures, so into the stripping jar they went. The original wood elves came in for a fair bit of criticism, being considered rather naff sculpts, but I think they have a certain charm of their own and still paint up reasonably well...


I like them anyway! I still want to get some of the new Mirkwood figures from the The Hobbit of course, the Rangers and Guards look great. Oh, and Tauriel is of course on the wants list - babe! As much as I liked Arwen, Tauriel has a bit more 'Xena' about her, if you get my drift!?


Next up today...whilst rummaging through old figures with a view to selling stuff off... I came across an old Dwarf Bugman's Beer Cart, that I had got to go along with my old Warhammer army... looking at it I was immediately struck by the similarity to the Southfarthing Beer Cart at the Hobbiton set:

South Farthing Ale cart at Hobbiton set
... and so a seed of a plan began to germinate...

A little while later whilst Chris and I were looking through the series of Journey book scenarios, with a view to models we would need to get to complete all the scenarios, one scenario Chris looked at and proclaimed, "We'll never be able to play that one properly!" ... "Why not?" I replied..., "You need Treebeard, but without the hobbits riding on him. You already made ours with the hobbits on him..."

Right thought I, not to be outdone...I later came across a new unmade Treebeard set on ebay and managed to win it for a small amount, compared to new...

And so the kit arrived with all parts complete and now I can make Treebeard by himself without being bothered by hobbits along for the ride. But it did give me a spare two seated hobbit models...Perfect, just what I needed...

And so Bugman's Beers cart went in to the stripping jar, after the dwarf driver was snipped off... a little clean up, filing and greenstuff and here we have a Hobbition Ale cart...


Complete with two hobbit drivers...


It was rather interesting to get it stripped back, it just showed how much I was still learning back then... several mold lines hadn't been filed away! So I had a bit of work to do. Also interesting seeing the copyright date on the pony's base tab ; GW 1987 I think, the last number was a bit deformed, fairly sure it was a seven, it couldn't have been a 1 as I was only 11 then and hadn't started gaming... ah well, a brief return to my youth and nostalgia!

... I'm rather looking forward to painting this up. I'll mount it on a 60mm round base in keeping with the rest of the basing for the LOTR SBG game...

Lastly for today... I couldn't resist doing a bit here and there through the week on my Durin's Causeway... adding a extra width panel throughout. Its given the whole a far more robust feel, more solid, more dwarf like!


Of course still a long ways to go, but I feel the foundation is now well made.


I am now pondering ahead to the best way to effect a sense of flame and fire below...


... and was pondering recessing a load of the those yellow twinkle LEDs into the base and covering with some diffuser and resin.... or perhaps I am going a bit over the top again???


Food for thought anyway :-)


Right, enough blogging for now, back to painting the Hobbit Dwarfs... I have a free arvo as my son is with a mate at the cinema watching Spiderman... not my thing!

Till next time...

Tuesday, December 04, 2007

Warhammer English Civil War - Parliament

This project started late 2005 / early 2006 (I think?), shortly after I had first moved to New Zealand. The small town I had moved to, Whakatane, did not appear to have any local wargamers, but after doing a bit internet surfing I came across a chap in the next town over, Rotorua, called Nathan Ward.

I was interested in playing Warhammer Historical, at the time I was finishing off a medieval army. Nathan was considering Warhammer but for the English Civil War supplement. So we mutually decided to give this period and rule-set a whirl. I had previously picked up a set of rules from E-bay, but not done anything with them at that point.

Next we had to get some miniatures. My first port of call normally for figures is Foundry. However, having checked out the Foundry range I was not overly impressed with some of the poses; the musketeers looked oddly crouched over which did not appeal. Also the price of Foundry figures plus postage to New Zealand, was prohibitive.

Yet more internet searching revealed Renegade miniatures, who had at the time, a post free worldwide deal on their army deals. I gleefully ordered the foot and horse army packs. These came through a little while later and I set to work; filing, basing and undercoating so that we could get a feel for the rules, with based figures. The figures were nicely sculpted and slightly larger than the Foundry figures I was used to.

The only problem at the time was that Renegade were only offering the foot and horse, with no other figures available; no artillery, dragoons and other desirable figures. More internet searching revealed that compatible ranges in style and scale were Bicorne and Redoubt. I liked the look of the Bicorne figures and found helpful responses from Andrew Barrett at Bicorne, with questions about the ranges on offer.

I have to say I was put off going with Redoubt, who may have had a wider range but a lot of their figures came with separate heads and to be honest I couldn't be bothered with the hassle of having to glue them all into place.

So Bicorne won my business and some artillery and dragoons and militia etc were finally ordered.

Just as things were starting to progress nicely, our plans for New Zealand changed, and my family and I moved south to Kapiti Coast. Not finding anyone playing WECW locally, but meeting up with guys at the Wellington Warlords who were playing Warhammer Ancients, I decided to start an ancient germanic barbarian army.(See separate post for full details of this venture!)

So my poor old WECW army got put on the back burner...

During the time of painting up my Barbarians I had met with the local Kapiti Fusiliers and Fusilier Steve Sands was interested in the ECW period and had an army, although based for WRG. Over time, Steve very sportingly decided to give these WECW rules a go, and gradually re-based his army and off I went again with my WECW painting project.

I still have a ways to go but heres whats done so far (Dec 07):


This is the first regiment of foote I painted. All Renegade, painted in acrylics, on magnetized bases and movement trays. The pikes are 100mm Foundry spears/pikes, and very sharp they are too! The flag is hand-made and painted, but I may replace this with a commercially available one from GMB.


The second regiment of foote painted. Again all Renegade. I still need to sort out the flag for the ensign of this regiment.


Some spare Renegade musketeers were painted in general, non-uniformed colours, to act as a separate Forlorn Hope, or add some extra figures to the other foote regiments shot sleeves.

It was at about this point that my ECW painting stalled to go on to the Barbarians.


When painting finally resumed, I decided to "let myself in gradually" to the period again (and not be scared off by having to face painting big units!), and started with some artillery and crews. These are Falconets, light guns, from Bicorne.


These are Sakers, medium guns, again from Bicorne.


Well I guess an army needs someone to lead it into battle, so here are the Parliament Commanders. From left to right, William Waller, Thomas Fairfax and Oliver Cromwell. Figures from Bicorne.


There was no putting it off any longer. I had to make a start on the cavalry. I tend to prefer painting infantry to cavalry, as the individual models paint faster. Consequently I tend to find cavalry a bit of a slog, but there was nothing for it but to press on. These are heavy horse, with breast and backplate and gauntlet on left arm. Figures from Renegade.


And then I decided to place another little order with Bicorne to fill another few gaps in my force. A mortar and crew duly arrived and were painted up as a nice interlude to the cavalry. The mortar, shells and red jacketed crew member are Bicorne, the other crew are spare cannon crew, also from Bicorne. There is a nice little pair of mortar crew I am still busy with who are carrying a mortar shell between them. I'll post a picture when finished.


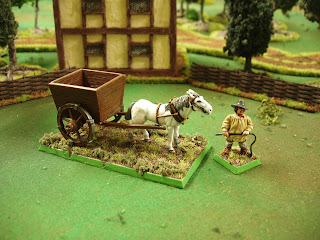
Having decided to turn our ECW games into a campaign, where armies would march with baggage trains, I needed to get some carts and wagons to represent this on the table top. Again Bicorne came through with some nice figures. This is their cart and driver. This was a multi-part piece that needed assembling. The parts were well sculpted but a little fiddly to assemble. I used Araldite for glue (a two part epoxy) and used Blu-tac to hold pieces together while glue sets. I prefer Araldite to super-glue as it makes a stronger less brittle bond, although does have the nuisance of taking a little while to set. The base is several GW cavalry bases glued long edge to long edge, and the sloped edges filled with glue and sand.


And finally the four wheeled wagon again from Bicorne.

Of course it has to be said both cart and wagon are empty of supplies! I will have to sculpt some sacks with Greenstuff, and add them later.

No doubt these carts and wagons will see a lot of service in my future gaming as they will probably do service in many armies, medieval onwards, either as baggage trains or perhaps just battlefield decoration.

Well thats enough distraction, back to painting those horses!
Related Posts Plugin for WordPress, Blogger...