More work over the weekend, saw progress on my Moria terrain...
I managed to build up the rocks on back wall of causeway to right of stairs... polyfilla looks dark as its not fully dried yet... also, photo perspective may seem odd... I actually had it lying on its back while I worked on it, and photographed it that way, and have rotated the picture around - that's why the paint tin is upside down in the background ;-)
The side wall is undergoing more reinforcing and straightening still... that part of the build is becoming a bit of a nightmare! I am beginning to wonder whether I should even bother with it, but its one of those classic movie moments - seems a shame not to try and do it justice... I'll get there in the end I guess... this project is rapidly becoming known , at least to me, as 'Bowmans Folly'! ;-)
I should buy shares in Polyfilla!
Back to the Bridge of Khazad Dum board... and I finished making the chasm edge... with my DIY 'plaster cloth'
I made up more polyfilla, though quite runny with an excess of water, then also poured some PVA glue into the mix. I cut strips of crepe bandage and dunked them in the mix, keeping one end dry. This I hot glued to the top edge, then draped the wet cloth down over the chasm edge, going back over the dry top piece with more of the mixture to blend it all together. Strip by strip, I worked my way along both sides... a messy process but it worked and is strong.
I now want to texture up the surface of this chasm, and am thinking of breaking up more foam (or maybe also bark mulch chips) into tiny fragments - spraying the surface with thinned PVA, sprinkle the fragments on , then spray again with glue to seal, them maybe skim coat with thinned filla again if it needs it or just paint with sand textured paint... I'll have to try it out see how it looks...
I was looking long and hard at the rubber rock molds you can get from Woodland Scenics and other suppliers at my local hobby stores. They are rather pricey and you would need several different ones to avoid repeating the same rock over an over... hmmm ... I like the look of them, but...
I also got my Dwarrowdelf pillars finished and painted... I'll show them soon, after the Watcher in the Water Battle report, as would be about the right timing! ;-)
Further Moria activity included cutting out a base board for Balins tomb, and sketching out a plan of how to build up the walls and pillars on it... So I guess that will be more foam cutting this weekend...
It's now glued to the base, and the main upright glued to the stair. I've started cutting out gullies into the base to further give the impressive of height in the stair columns. This has also allowed me to fashion the stony bridge section from bottom of the stairway across gully there.
I have decided I am going to make it corner-centric, and am going to back the structure in MDF and along its left side, so I can effect a rocky corner area, into which a gallery with pillars will be cut, for the goblins to shoot down from at the Fellowship as they flee down the stairs...as per movie...
I've also started cladding the lower areas in off-cut broken bits of poly I had left over... just to start to build up the structure and give it some texture...
I left it with the smaller side panels of MDF gluing , to give the base more strength...
I am still pondering how best to model flames and smoke in the gullies...
-----o0o-----
So while that was drying I moved back on the the Khazad Dum board... I attacked the surface of the pink foam stuff with a box cutter knife, and quickly effected a rocky surface. In that respect this material is very easy to work with.
I then also started to clad the sides of the board with more MDF, again for structural strength of the board.... and left that drying too... one side at a time as the PVA glue dries... though had to re-clamp down the end top surface to get a better fit after further trimming down the end piece of foam.
-----o0o-----
Back to modelling, and I decided that my Hobbit ale cart drivers would probably want a little comfort for their journey, so I fashioned a broad cushion out of greenstuff for the seat. This actually allowed me to push the hobbits into it, to allow their seating posture and angle to look better, more upright... I've also based the cart on a 60mm MDF round base, 3mm thick, and sand textured it.
And showing the hobbits in place. I plan to paint the cart and hobbits separately, and glue the hobbits into place at the end. This will allow me to try and freehand some words on the cart plaque behind their seat. That's the bit I am not looking forward to as my freehand skills are not the best...
-----o0o-----
Oh, and if you hadn't guessed, I've also moved on to the next model painting requirement for the Fellowship campaign; the Uruk-Hai Scouts... a boxed set of 24 plastic figures up first for starters... I've also got a handful of metal ones and Lurtz in the stripping jar from 2nd hand purchases... and am thinking of getting Vrasku and Mahur done at the same time, while I am working on the Uruks...
Making steady progress with these guys... they are fairly easy to do - dark armour, shades of brown and gray throughout and the majority wear full face helmets so no having to spend ages getting the faces right!
-----o0o-----
Back to terrain and the Watcher board, and my tales of woe... I am frustrated to heck that the bit I had expected to be the easy bit to finish it off, pour the water... has caused the most grief!
The Golden brand acrylic resin had dried but not clear, it was still opaque white over most of the water area. I am guessing this has either been because the layer applied was too thick or there was too much humidity as it dried, or both. To try and fix this I decided to try heating it with a heat gun... Whilst at first I thought this was going to work, suddenly the resin ballooned up off the surface, then shrank back down as heat was removed, drying in an awful wrinkly mess...
I let it dry, then tried peeling off the top surface, cutting slits in it and peeling bits back... then one piece came away thickly, lifting the whole resin thickness, exposing the base foam layer underneath... "Bollox!" I thought, and pulled... and the whole lot came off... back to square one!
So I have resurfaced this foam base in paint and glue to seal it, added pebbles and gravel and twigs to effect fallen logs, branches in the water etc...
Having watched again some of the Terranscape videos on Youtube, I have ordered some Envirotex Lite and some colouring pigment translucent dyes, and some Liquitex Gloss Gel Medium. The first product is poured in layers to effect water depth. The last product will effect a wavy surface ripple.
I am going to keep the Mod Podge for the river sections and redo those with a more realistic surface texture - I hope!
With luck I may have the Watcher Board finished for next weekend... fingers crossed!
PS - Bugger, just checked the stash - I don't have Vrasku afterall! Another one to source...
Continued work and play over the last week or so...
On the terrain front:
I continued work on the causeway, widening the whole structure, by adding another layer of the styrofoam against each facing. I increased the length of the broken stairway section at the top, and then, after watching the movie footage again realised there was another turn and more stairs at the bottom... so I added another stair section and raised the whole by another ~ 6". I also started on the base board using some of the foam material that was packed with the Styrofoam delivery. This new pink material has a consistency very similar to that green spongy foam florists use for flower arranging... its very light weight and fairly soft and crumbly. However its going to get coated in Polyfilla so should hold up OK...
I also had tried etching in a brick pattern with a ball point pen. This process worked well ( a lot easier than the DAS clay etch of the Victorian Buildings though yielding a wider mortar join.). However after finishing a couple of facings I couldn't help think it made the whole thing look like a Victorian rail bridge structure... so I am going to skimcoat filler over the top and not bother with a brick pattern... I think if the filler goes on rough, painting and drybrushing should yield a good enough texture to it, making it look either hewn from the rock or with some kind of render applied by the dwarves...
With the rest of this pink foam, I cut it to 5" thick widths and used to make a raised board for the Bridge of Khazad Dum scenario. I'm going with the description for the scenario from the new The Hobbit rulebook, so a 4'x4' board with a 6" wide chasm across the middle...
Tins of paint weighting down the top sheet of 3mm MDF. The bottom sheet is my left over piece of 12mm MDF from the sheet used to make the Pirate Isle. I figured this thicker sheet would be best for the base of this structure to stop it flexing through the chasm area.
On the miniature painting front;
I have been steadily working through the Hobbit dwarves set and am nearing completion, but I'll hold off putting pictures up just yet as I feel they'll deserve a post of their own... However I did complete Haldir of Lorien, in among painting the dwarves, for the upcoming Lothlorien scenario;
Haldir of Lorien
In gaming news;
Chris and I replayed the Hounds of Sauron scenario, using my tactical suggestion of backing the Fellowship up against the large rock just off centre of the board, and defending that area.
A heroic march to start, had the Fellowship pretty much in position on the first turn. Second turn had them aligned well as the Wargs caught them. Legolas climbed the rock to take up a firing position. And in rushed the Wargs. This time it was pretty much a breeze... none of the front rank defenders; Gandalf, Boromir, Gimli and Aragorn, ever had more than 2 wargs on them at any time, and Legolas was able to pick off wargs against Gandalf, who was probably the most vulnerable front rank fighter. The hobbits settled down to watch the show and the bodies of the wargs piled up...
Fellowship defends against the Hounds of Sauron
16 Turns later, and we drew the Priority roll, ending the game... The Fellowship members had not lost a single wound, though possibly one fate point, I can't recall exactly... and they had butchered dozens of wargs and the Wild Warg Chieftain.
So I'd call that a success! Chris was whooping and cheering as the game went on ... so I was happy to see his spirits raised once more :-)
So next mission and on to Watcher in the Water...
Which brings us back to terrain matters, and tales of water woe!
I have used Woodland Scenics Realistic water, for a couple of past projects, including pouring the stream on the Helms Deep, Deeping Wall scenario, and when I made my Normandy Beach section. And for the most part it has worked well. So long as you pour it in thin layers and allow to dry between each pour...
Its a fairly clear liquid that pretty much self levels with each pour... and once dry is transparent with a glossy water sheen.
Recent use though has been a little problematic as its has taken some time to dry in the autumnal conditions here. Its also not the cheapest product to buy either, and I decided to Google about and see what alternative cheaper products might be available... and I came across this webpage from a model railway blog...
If you read the page, you will see the author discusses an 'Identical' product to Realistic Water, that is much cheaper, and available through art stores. I was quite pleased with this find, and further finding the product available here in NZ, at roughly half the price of the WS product. So I ordered a pack of the Golden Acrylic, from Gordon Harris in Wello and it arrived 2 days later.
I cracked open the top, to find an opaque white product. Hmmm ok, well lets give it a go... Yep it poured out but it was very thick and was not self leveling, and had to be spread out with a spatula-like tool. It was still pretty thick after spreading, and not flat... 24hrs later with a fan blowing across it and its still white and wet... I am hoping like mad it will eventually dry out and go clear. Fingers crossed!!!
Another product I came across was this Magic Water... though it seems relatively expensive and I couldn't see a NZ based supplier so that would mean International shipping costs on top...
It does sound like a very good product.
However, yet more Googling and I came across this video: (skip past the ad at the start)
This is just the sort of finish I want for my water areas, and what a great video find, to see how its done.
Not only that but looking at the cover of the Fellowship of the Ring Journey book, shows the same water finish effect there used for the Buckleberry Ferry scenario/diorama ;
So back to that video, and the product used to make the rippling water surface is Mod Podge:
More Googling and I found this stocked here in NZ at Warehouse Stationary... so I've bought a couple of packs. So if that Golden acrylic product ever dries, I'll be using this over the top to get the surface finish I am after!
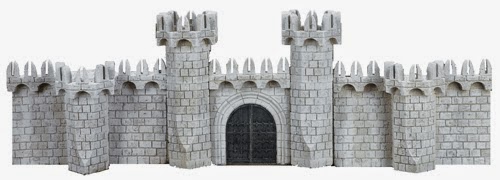
Finally for today, and on the purchase scene I managed to grab a set of Minas Tirith Walls off Trademe. Now discontinued, this is now only going to be a 2nd hand purchase from Ebay or Trademe... So I was happy to find a set here in NZ for sale, so I didn't have to pay international shipping.
I'll use these sections as templates to make more sections from yet more Styrofoam... Now I've got a reason to get on with painting all those Warriors of Minas Tirith I have!
That's the thing with gaming Middle earth, there's so much to it, so many locations and differing Factions, you never get bored!
Till next time, dear adventurer, hold true to your purpose, and make sure you have some Lembas Bread or seed cakes about your person!