Showing posts with label Terrace. Show all posts

Saturday, November 09, 2013

Victorian Terrace #2 - Completed!

Finally finished Victorian Terrace #2 today, despite coming down with the lurgy earlier in the week and not really feeling like doing any hobby work. I visited the local apothecary, was prescribed a suitable potion, kept calm and carried on! ;-)

 So without further ado, here's the completed building, all painted and lights in working order...


Front view
I decided to go with a different brick colour, after reading an interesting blog post on East London buildings by the Legatus, here.

Side view
I also added some posters to the gable ends, some themed from EotD and other general Victoriana I found on the web.

Rear view
I also added some grassy weeds to the rear yard, just to give it a little life and contrast.

Another side view

Close up posters
Infernium, the fuel of the future, rumored to be the crystallized blood of fallen angels!

More posters
Some street scenes...


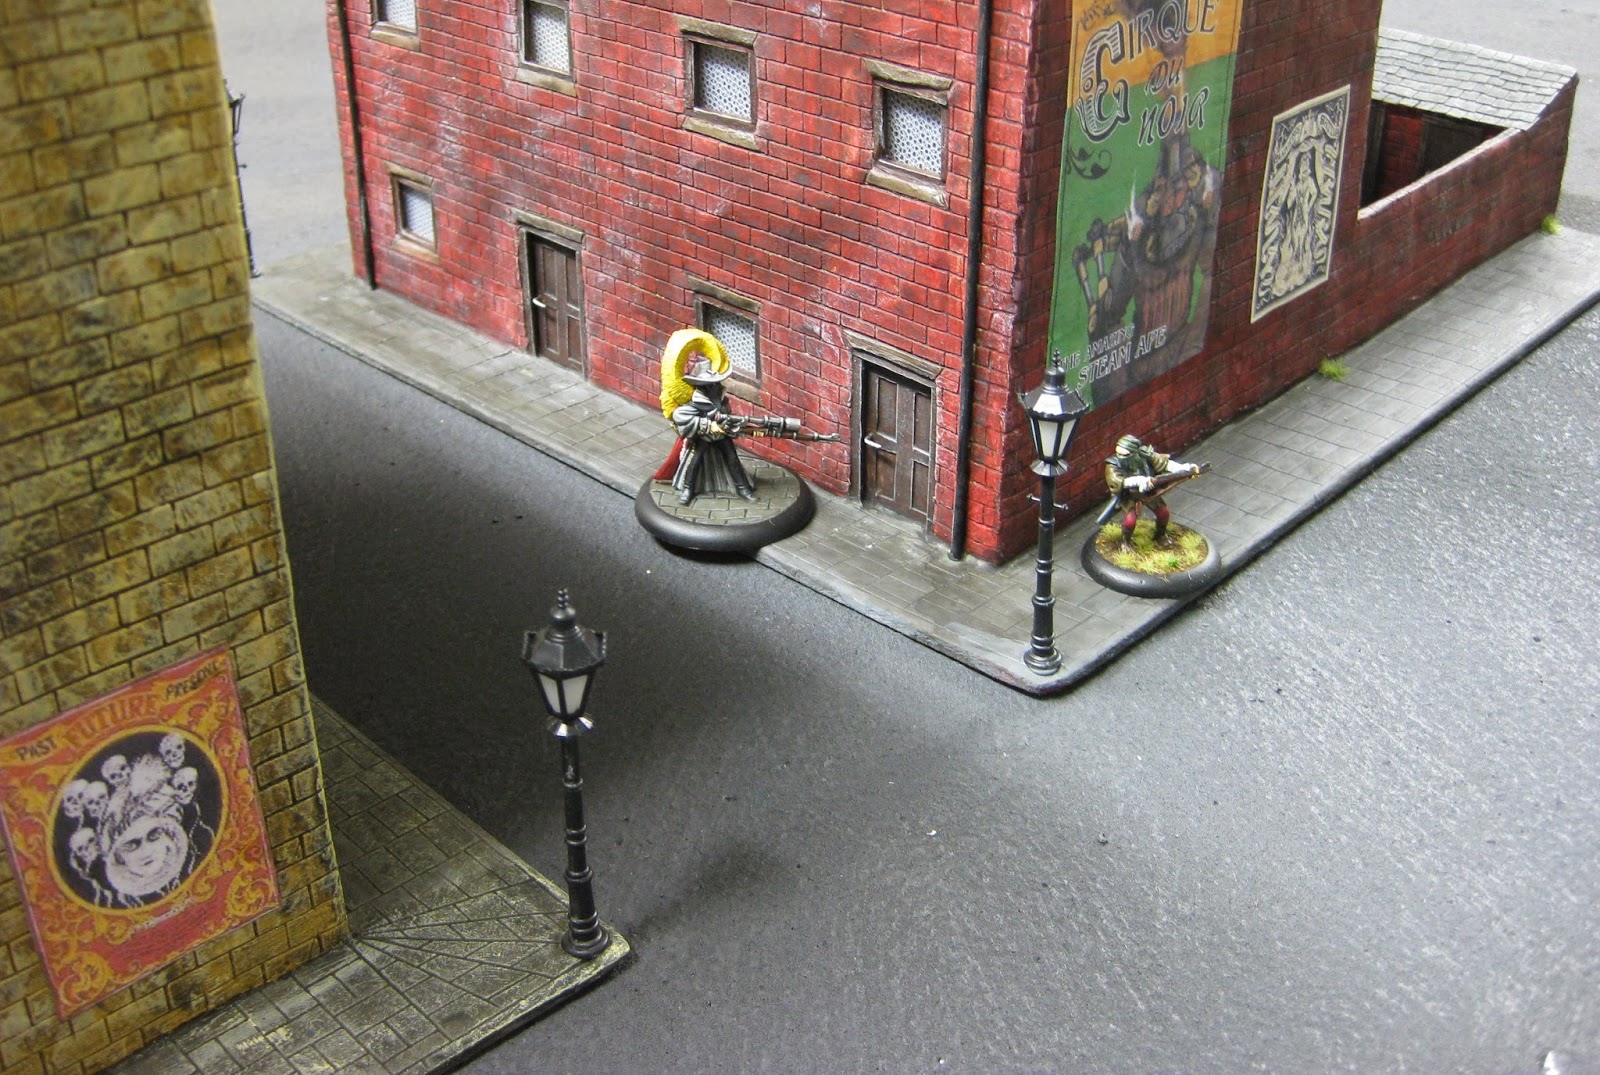
Having two buildings complete now means I can start to get some decent cameos, with one building providing the back drop to the other. As you can tell I also went back and added posters to the original red brick terrace building and again added weeds to its rear yard too.


Lights go on as twilight approaches (main room lights off, just display case halogens on)...sorry pics get a little blurry here, the camera struggles with the low light and shaky hand! Sorry.


Proper night time shots (room lights off completely)... very pleased with these, rather atmospheric I think!


And finally the two buildings together, on the 4' x 4' base board I made for goblin town. It will do till I sort out a board with a fully cobbled surface.


So final total build time on second house was 7.5 weeks. Much better than the 5 months the first one took me! But I did concentrate more purposefully upon it, once I knew Requiem was immanent and I had learnt a lot from building the first one...

What next then, I hear you cry? I need to clear the painting table, as its currently got some FOW begleit troops on it before I can make a start on the Requiem figures... And as for the next building... I am thinking about doing a corner public house...


Saturday, November 02, 2013

Victorian terrace#2, WIP 10 - 'detailing'

Another couple of quick pictures, to show finished assembly, pretty much...

Clay clad the pavement and etched in the paving slab pattern... sand filled the rear yard area and added paving slab path... added Evergreen 'plastruct' for guttering, drainpipes and chimney pots... and some bent wire for door handles...

I have drilled the holes to take the Gaslamps at the front corners of the pavement...

But next up we are ready for paint...


Monday, October 28, 2013

Victorian Terrace #2, WIP9 - LED lighting, Curtains and base.

With the long weekend here in NZ, I had three days, in which to make some more progress...

First job was to ready the lighting rig; 20 twinkle effect yellow LEDs, wired together in a parallel circuit, so only one resistor was needed, which was wired in first to the positive terminal of the twin D size battery holder.

Lighting rig.
The lighting rig was then hot glued to a piece of MDF cut to fit the internal shape of the house, with 10 lights to either side. Another piece of MDF went across the top, so the battery holder could be placed in the roof void.
Lights and battery holder

Prior to installing the lights, I had put up the curtains. I found a supply of white material that would do for a net curtain effect, glued into place, over the lower half of each window. Then strips of material were glued in to effect curtains (handy having a mother-in-law who sews, and has an endless supply...)

Lighting and Curtains.
So with curtains fitted, and lighting in place; a quick picture. Not much to see in daylight;


...but with the lights out,  the effect is quite pleasing; imagine these twinkling...

Night time lighting effect
Th last thing over the weekend, with the internals complete, was to add the perimeter pavement. Another piece of MDF. This will be clad with DAS clay, and a paving slab pattern etched in...

MDF pavement perimeter added

Also over the weekend, to get us in the mood for some Victorian era drama, I downloaded the Dracula sound track from ITunes...


... so we could have it playing, while playing Fury of Dracula, with my son Chris. Great fun :-)

Victory went to the Count! I vant to byte you neck, blah blah blah,...a little bit of Hotel Transylvania there too!... ;-)

Next up for the house, once pavement done, will be to add the Gaslamps, wire those in, add chimney pots, gutters and drain pipes and paint the whole thing... Nearly done now.

Saturday, October 26, 2013

Victorian Terrace #2 - WIP8 - Roof tiling finished!

Just another quick post to show the roof tiling now complete, on main dwelling and outhouses.

Front

I had hoped to get this done by last weekend, but one or two other urgent projects got in the way!

Back
Still, back on track now...

Outhouses

Long weekend here in NZ, for 'Labour Day' weekend, so will press on with rigging up internal lighting, if time allows...

Wednesday, October 16, 2013

Victorian Terrace #2 - WIP7 - Roof half tiled.

Just a very quick update picture today; I have managed to get one side of the roof finished in its cladding of card tile rectangles.

I made the roof base from the mounting card on Saturday night and started cladding Sunday, and have done a couple of hours or so each evening since then. So roughly half a week to get one side done.


At the beginning of the week I got my email from Andy and Wendy @ Westwind, that my Requiem pledge level will be shipping out shortly, so it has motivated me to keep pressing on with this, this week!

Of course, the crunch is going to come, once the figures arrive... do I keep on with terrain, or start painting the gorgeous figures!?... it's going to be a tough call...

So, can I get the other side done by the end of the week!?

Total build time so far - 1 month.


Friday, October 11, 2013

Victorian Terrace #2 WIP6 - brick etching finished.

Having taken the last week of the school holidays off to spend some time with the kids, I have also found myself with a little hobby time here and there, as playdates were organised for the kids, and naff weather (typical school hols huh?) has kept me inside...

 A final cramming session today saw the brick etching finally finished on Victorian Terrace #2... Pics as below...


Not too bad for ~3½ weeks work!

So next job is to sort out the roof. I need to make a base lift off type structure as last time, using 'mounting card' - a thick card base used by picture framers. Its about 3mm thick card, and can be cut with a stanley-craft-type knife though it takes several passes against a steel rule. Once this in position, I can start cladding it with card tiles for the roof tile effect. This will be the most laborious part of the project (small inward groan!) ;-)

Wish me luck, and patience!

Thursday, September 26, 2013

Victorian Terrace #2 - Clay cladding finished - WIP5

Another quick post, just to show clay cladding finished now...


Not too bad for just inside two weeks work... next up brick pattern scoring/etching. Depending on weather, domestic duties and family fun, I may get this done over the weekend...

After that's done, its make the roof time...

In the meantime, one more London Thug to finish off and I have my Mob done too.

Sunday, September 22, 2013

Victorian Terrace #2, WIP4, half clayed...

Just another quick update picture - managed to get two facings and the fiddly rear yard areas clad with clay on Saturday afternoon...


Will hopefully get the rest clad today, Sunday, unless No.1 son can be prised off the computer for a game of something ... still pretty miserable weather here in NZ so no guilty feelings staying indoors having hobby time!

Quite pleased with progress so far, I've got to this point in a week...

Saturday, September 21, 2013

Victorian Terrace #2 WIP3 door details

Another quick post to show door details being added... card cut outs to give paneled door effect on main dwelling...


...and scored balsa for the rear gates and outbuilding doors and hatches, with some matchstick frames again...


Right its a wet Saturday here in NZ and... Emirates Team New Zealand has been struck down with bad luck... grump grump... off to clad some clay...

Friday, September 20, 2013

Victorian Terrace #2 WIP - windows

Just a quick update to show the matchstick window and door frames added.


The windows have also had their clear plastic window panes added - the glue will dry clear...


And the main doors have been blocked in with card for he next paneled layer to be added on top.

Little items of progress, bit by bit...

Tuesday, September 17, 2013

Victorian Terrace #2 - WIP

Sunday night I drew out the pieces needed on 3mm MDF sheet for the next terrace, and got the main pieces cut out Monday night, and glued these together.


And then tonight I cut out the remaining smaller rear wall pieces and chimney widening pieces. Glued and clamped together.


Three nights work... not bad...

I learned the hard way with the first one about the warping caused by the DAS clay cladding, so decided to construct the whole thing this time first before applying the clay.

Next part will be the matchstick window frames, balsa rear yard gates, and other door and window details...

Talking of which, the astute among you may have noticed the larger windows... I decided this would be a slightly more upmarket section of terrace with larger windows, and thus paying for more window tax...

I kid you not; in the olden days households were taxed for the numbers and size of windows they had - consequently it's possible to find many old examples of bricked up windows in British buildings, to avoid paying extra taxes!

Right, while the above dries , back to painting figures...

Sunday, September 08, 2013

Victorian Terrace - Completed !

Well, its been a long time coming! I think I started this back in April, so that's been about 5 months off and on getting this made, the longest I think I have ever done on a single terrain piece.

I have learned a lot from the process; using MDF to make the structure, seeing how the darn stuff can warp, then how to fix that. Using DAS clay to add an etched brick surface, endless card tile cladding, and the wonders of electricity in the lighting rig.

 But I think the effort has been worth while... I just need to convince myself to start the next one now! I'll need several more to complete the city scene...

 But for now, I hope you enjoy the pictures...

LED Gaslamp

Victorian terrace


Rear yards ... I'd still like to add a bit more detritus...

Gable end ... I'd still like to add some ads and posters and such..

Street scenes...


Ripper Street?

Saved, in the nick of time...

Lady Luck, by Gaslamp...

Nocturnal shots

Sorry, hard to focus with the low light...
So that's one down , 4-5 more to go... oh well, at least its a start!
Related Posts Plugin for WordPress, Blogger...