The ongoing saga of the Causeway board... I have added several rocky ledges and levels to allow goblins to scale the walls in various scenarios...
And have 'dwarfed up' the goblins shooting gallery, with pillars and trim...
Up next will be adding the flame effects in the base of the board....
I have made some flame makers made from clear plastic sheet - the sort you get from the typical plastic clam/ blister packs many goods come in these days, or even using a sheet made from laminating sheet off cuts...
Cut out a circle with a wedge piece cut out then glued it up into a cone shape. Then added more cut spiky pieces as flames and glued these on top. Then covered the whole thing in Woodland Scenics Water Effect. And then painted using GW yellow ink and orange ink....
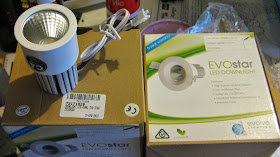
I then considered the lighting of these... I was going to use several LED bulbs wired together, but I don't think I will get enough intensity to light up the whole flame-effect piece sufficiently... so I went to the local electrical store, and had a chat there about what I needed. I came away with 4 of these LED light units.
They are small, compact and cool running, mains power plug-in type. So they will fit under the board and not cause any heat problems and have enough intensity to light up the flame-effect piece... I think I am still going to need to build up the thickness of the base board to fit these, but that should not be too difficult...
Reduced from NZ$75 each to NZ$25 each... not bad I thought...
So once positioned underneath the the flame effect piece, I am hoping they will look something like this:
This was done sitting the flame effect piece on top of the upturned energy bulb (equiv 60W) of my angle poise desk lamp... Quite nice I thought... I will glue on top lots of black sprayed 'filter floss medium' to effect black smoke rising above...
So that's the Causeway board progressing...
-----o0o-----
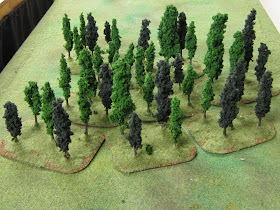
You may recall I moaned recently about my mini disaster using the Woodland scenics tree kits? Well I managed to salvage them and got them based up, gluing 4-5 trees per piece of MDF base... So they worked out OK in the end... though I must admit, the 'tree kit', to my mind did not come with enough clump foliage to cover all the tree armatures provided... In the picture below the darker trees were done using the kit... the lighter ones I had to finish with spare clump material that I had, even though it was a lighter shade. Still it makes for a more pleasing effect I think with the varying colours together...
 |
| Woodland Scenics pine trees |
Here's what I got...
So just need to break it up into pieces and glue it to some garden twigs to make the basic tree, then flock the horsehair...
Of course I couldn't resist playing about ... 'Instant Treebeard'... just add idiot! ;-)
Stay tuned for more, if I can regain my sanity!
-----o0o-----
PS I'm on holiday at the moment so haven't been perusing blogs as usual, I'll try and catch up next week... Cheers all,
Scott


It look just fantastic Scott!
ReplyDeleteChristopher
Making progress. Looks really good.
ReplyDeletecheers
You sure do love LED lights in things they do look pretty impressive. Th Goblin shooting gallery is fantastic. I'll be the wife loved the instant beard.
ReplyDeleteI've always been a bit skeptical about tree kits for exactly the reason you had issues. They seems to have turned out well in the end though.
ReplyDeleteThat Moria board is going to be, without doubt, the finest Lord of the Rings wargaming board ever made by anyone. It is just awesome!
ReplyDeleteSpectacular!
ReplyDeleteGreat work there Scott! Love the last photo!
ReplyDeleteComing along nicely. Looking forward to seeing how your trees turn out.
ReplyDeleteNeeeeed that new treebeard model!
ReplyDeleteIngenious work, Scott!
ReplyDeleteLooking good. Really like the 'steps' for the goblins. The flame effects look top notch. Have fun with the horsehair, you should find that a little will go a long way.
ReplyDeleteWow! What an awesome project! Really interested to see the final write up on it. As always thanks for a great blog, very entertaining and inspiring!
ReplyDeleteWow. Cool stuff! That Causeway board is just epic!
ReplyDeleteAmazing! :D
ReplyDeleteThe terrain board is fantastic !
ReplyDeletegood use of the trees : they look much better !
strange beard ... I hope that you're feeling better ...
This will truely be a spectacular gaming board. I really like the additions you made and the first experiments with the LED's look promising.
ReplyDeleteI would suggest to make the flames slightly more irregular, to achieve the 'lambent' flame look.
You might also like to check out Terranscapes, as Mike did some nice lava effect in one of his builds: http://youtu.be/w7Fh7EHubIQ?list=UUotNwY5c3SD_sDjejcFJ_7Q
Anyhow, I really look forward to see this painted up,